Databricks Integration Guide
Last updated: May 18, 2026
This guide helps you connect your Databricks workspace with the Matters Dashboard. By following these steps, you will enable Matters to access your Databricks resources for running Classification scans.
Prerequisite
Before starting the integration process, ensure the following requirement is met:
Your Databricks account must be linked to an AWS account, and that AWS account must already be connected to the Matters Dashboard.
This is essential to enable proper access to S3 buckets and allow Matters to perform scans and manage data securely.
Step 1: Create Service Principal & Generate Credentials
1.1 Create Service Principal
Log into your Databricks Console.
Click on User Management from the left-side menu.
Open the Service Principals tab.
Click Add Service Principal.
Save its Application ID for later use.

1.2 Generate Credentials
Open the newly created service principal.

Go to Credentials and Secrets.
Click on Generate secret.

Copy and securely store:
Client ID
Client Secret

Step 2: Assign Workspace Permissions
2.1 Select Workspace
Navigate to Workspace.
Select the workspace you want to integrate.

2.2 Add Permissions
Go to the Permissions tab.
Click Add Permissions.
Select the previously created Service Principal.
Assign User access to it.
Note: For full access graph visibility, Admin privileges on the workspace are required.

Step 3: Create Compute Policy
This policy is used to export catalogue data to S3 instead of creating compute directly.
3.1 Create Policy
Go to Databricks Workspace.
Click Open Workspace (top-right corner).

Navigate to Compute → Policies.
Click Create Policy.

Enter a descriptive name.
Select Job Compute as the family.
Click Create.

3.2 Grant Access to Policy
Open the created policy.
Click See all permissions.

Add the service principal.
Assign Can Use access.
Click Add and Save.

3.3 Retrieve Policy ID
Copy the Policy ID from the policy details page.
Save it for use during dashboard integration.

Step 4: Grant Additional Permissions
4.1 Workspace Permissions
Open your Workspace.
Click Share.
Grant the service principal Can Manage permission.
Alternative: Create a folder named "Matters" in your workspace and assign "Can Manage" permission to the service principal.

4.2 Catalog Permissions
Create Notebook
Go to Workspace.
Click Create (top-right).
Create a new Notebook.

Add and Run Code
Paste the following code
Replace
<YOUR SERVICE PRINCIPAL APPLICATION ID>with the actual value.
Run the notebook.
# Import necessary libraries
from pyspark.sql import SparkSession

# Initialize Spark session
spark = SparkSession.builder.appName("GrantPermissions").getOrCreate()

# List all catalogs
catalogs_df = spark.sql("SHOW CATALOGS")

# Service principal name
service_principal = "<YOUR SERVICE PRINCIPAL APPLICATION ID>"

# Filter out sample catalogs
filtered_catalogs_df = catalogs_df.filter("catalog NOT LIKE 'sample%'")

# Iterate over each catalog and grant permissions
for row in filtered_catalogs_df.collect():
    catalog_name = row['catalog']
    if catalog_name in ['system', 'samples', 'hive_metastore']:
        continue
    grant_query = f"""
			GRANT BROWSE, EXECUTE, READ_VOLUME, SELECT, USE_CATALOG, USE_SCHEMA
			ON CATALOG `{catalog_name}`
			TO `{service_principal}`
			"""
    spark.sql(grant_query)
Verify permissions across catalogs.
You will need to run this code each time a new catalog is created to ensure the required permissions are granted.

Step 5: Create Storage Credentials & AWS Setup
5.1 Create Storage Credentials in Databricks
Go to Settings → Credentials.

Click Create Credentials.

5.2 Create AWS Policy
Log in to AWS.
Go to IAM → Policies → Create Policy.

In the Next Step select JSON and Paste below Role Policy Object into the policy Editor and click on Next
{
    "Version": "2012-10-17",
    "Statement": [
        {
            "Action": [
                "s3:GetObject",
                "s3:PutObject",
                "s3:DeleteObject",
                "s3:ListBucket",
                "s3:GetBucketLocation",
                "s3:GetLifecycleConfiguration",
                "s3:PutLifecycleConfiguration"
            ],
            "Resource": [
                "arn:aws:s3:::*optiq*",
                "arn:aws:s3:::*optiq*/*"
            ],
            "Effect": "Allow"
        }
    ]}
Provide a policy name, optional description and click on Create Policy.

5.3 Create AWS Role
Navigate to IAM → Roles → Create Role.

Select:
Trusted entity: AWS Service
Use case: S3
Click on Next

Attach the previously created policy and Click on Next.

Provide a Role name,Optional Description, Review the Trust Policy .
Click Create Role.

5.4 Configure Role in Databricks
Copy the Role ARN from the created Role.

Paste it in Databricks IAM Role(ARN) textfield.
Enter a credential name.
Click Create.

Copy the generated Trust Policy.

Update the AWS role with this trust policy.

Step 6: Connect Databricks to Matters Dashboard
6.1 Collect Required Details
Copy the Databricks Instance URL.

6.2 Configure Integration
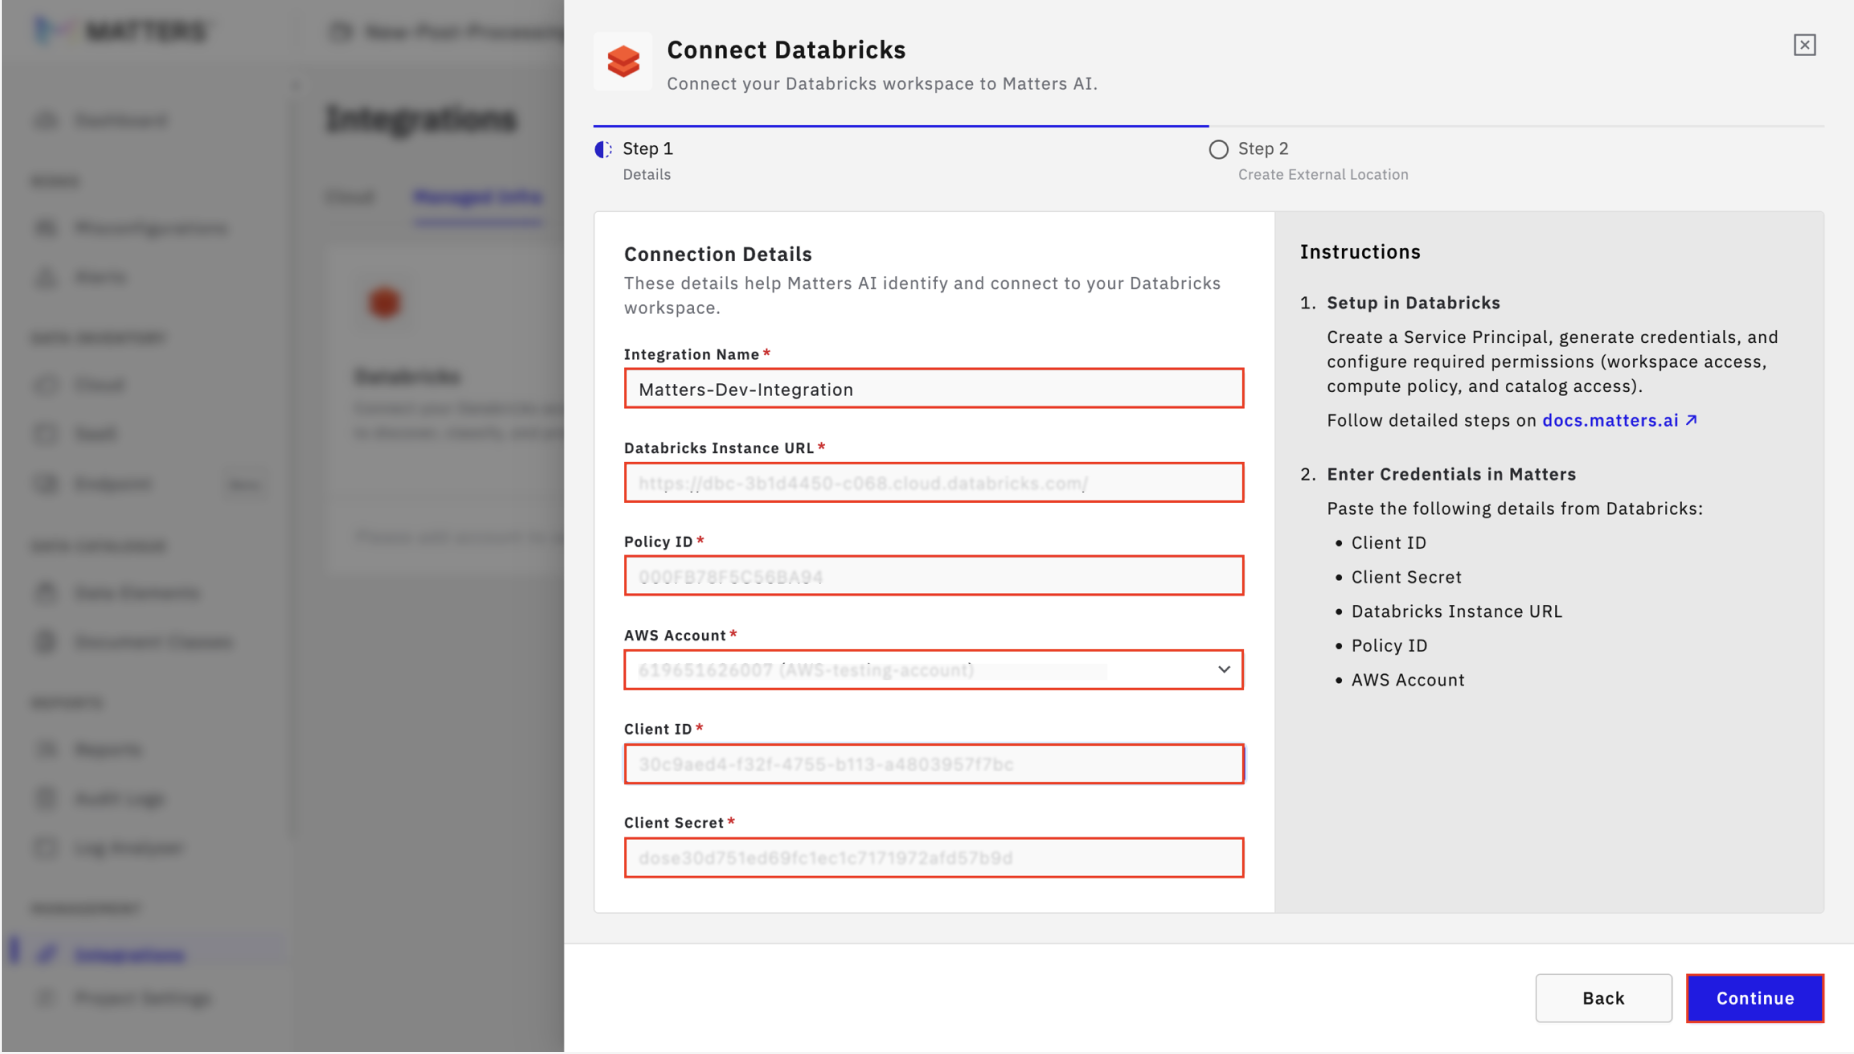
Log into Matters Dashboard → Integrations → Managed Infra.
Click Connect on Databricks.

6.3 Enter Details
Provide:
Integration Name
Databricks Instance URL
Policy ID
Selected Linked AWS account
Client ID
Client Secret
Click Continue.
Step 7: Configure External Location
7.1 Get S3 URL
Copy the S3 URL shown in the dashboard.

7.2 Create External Location in Databricks
On Databricks Console navigate back to Catalog>Settings→ External Locations → Create external location.

Select Manual method.

Enter:
External Location Name
Storage Type: S3
S3 URL(Displayed on Matters Dashboard)
Search and add previously created Storage Credential

Click on Create>Force Create and copy its External location name

7.3 Grant Permissions
Navigate to Catalog → Settings → External Locations.

Select the created location.

On permissions tab, grant the service principal:
Browse
Read Files
Write Files and Click on Confirm

7.4 Finalize
On Matters Dashboard ,paste the External Location Name.
Click Connect.

You will see “Your Databricks is Successfully Connected” message once Integration is complete

Step 8: Discovery and Classification
Once the Databricks is successfully Integrated, all the Catalogs will be automatically discovered and listed on the Cloud Inventory of Matters Dashboard.

Click on the Catalog you wish to classify
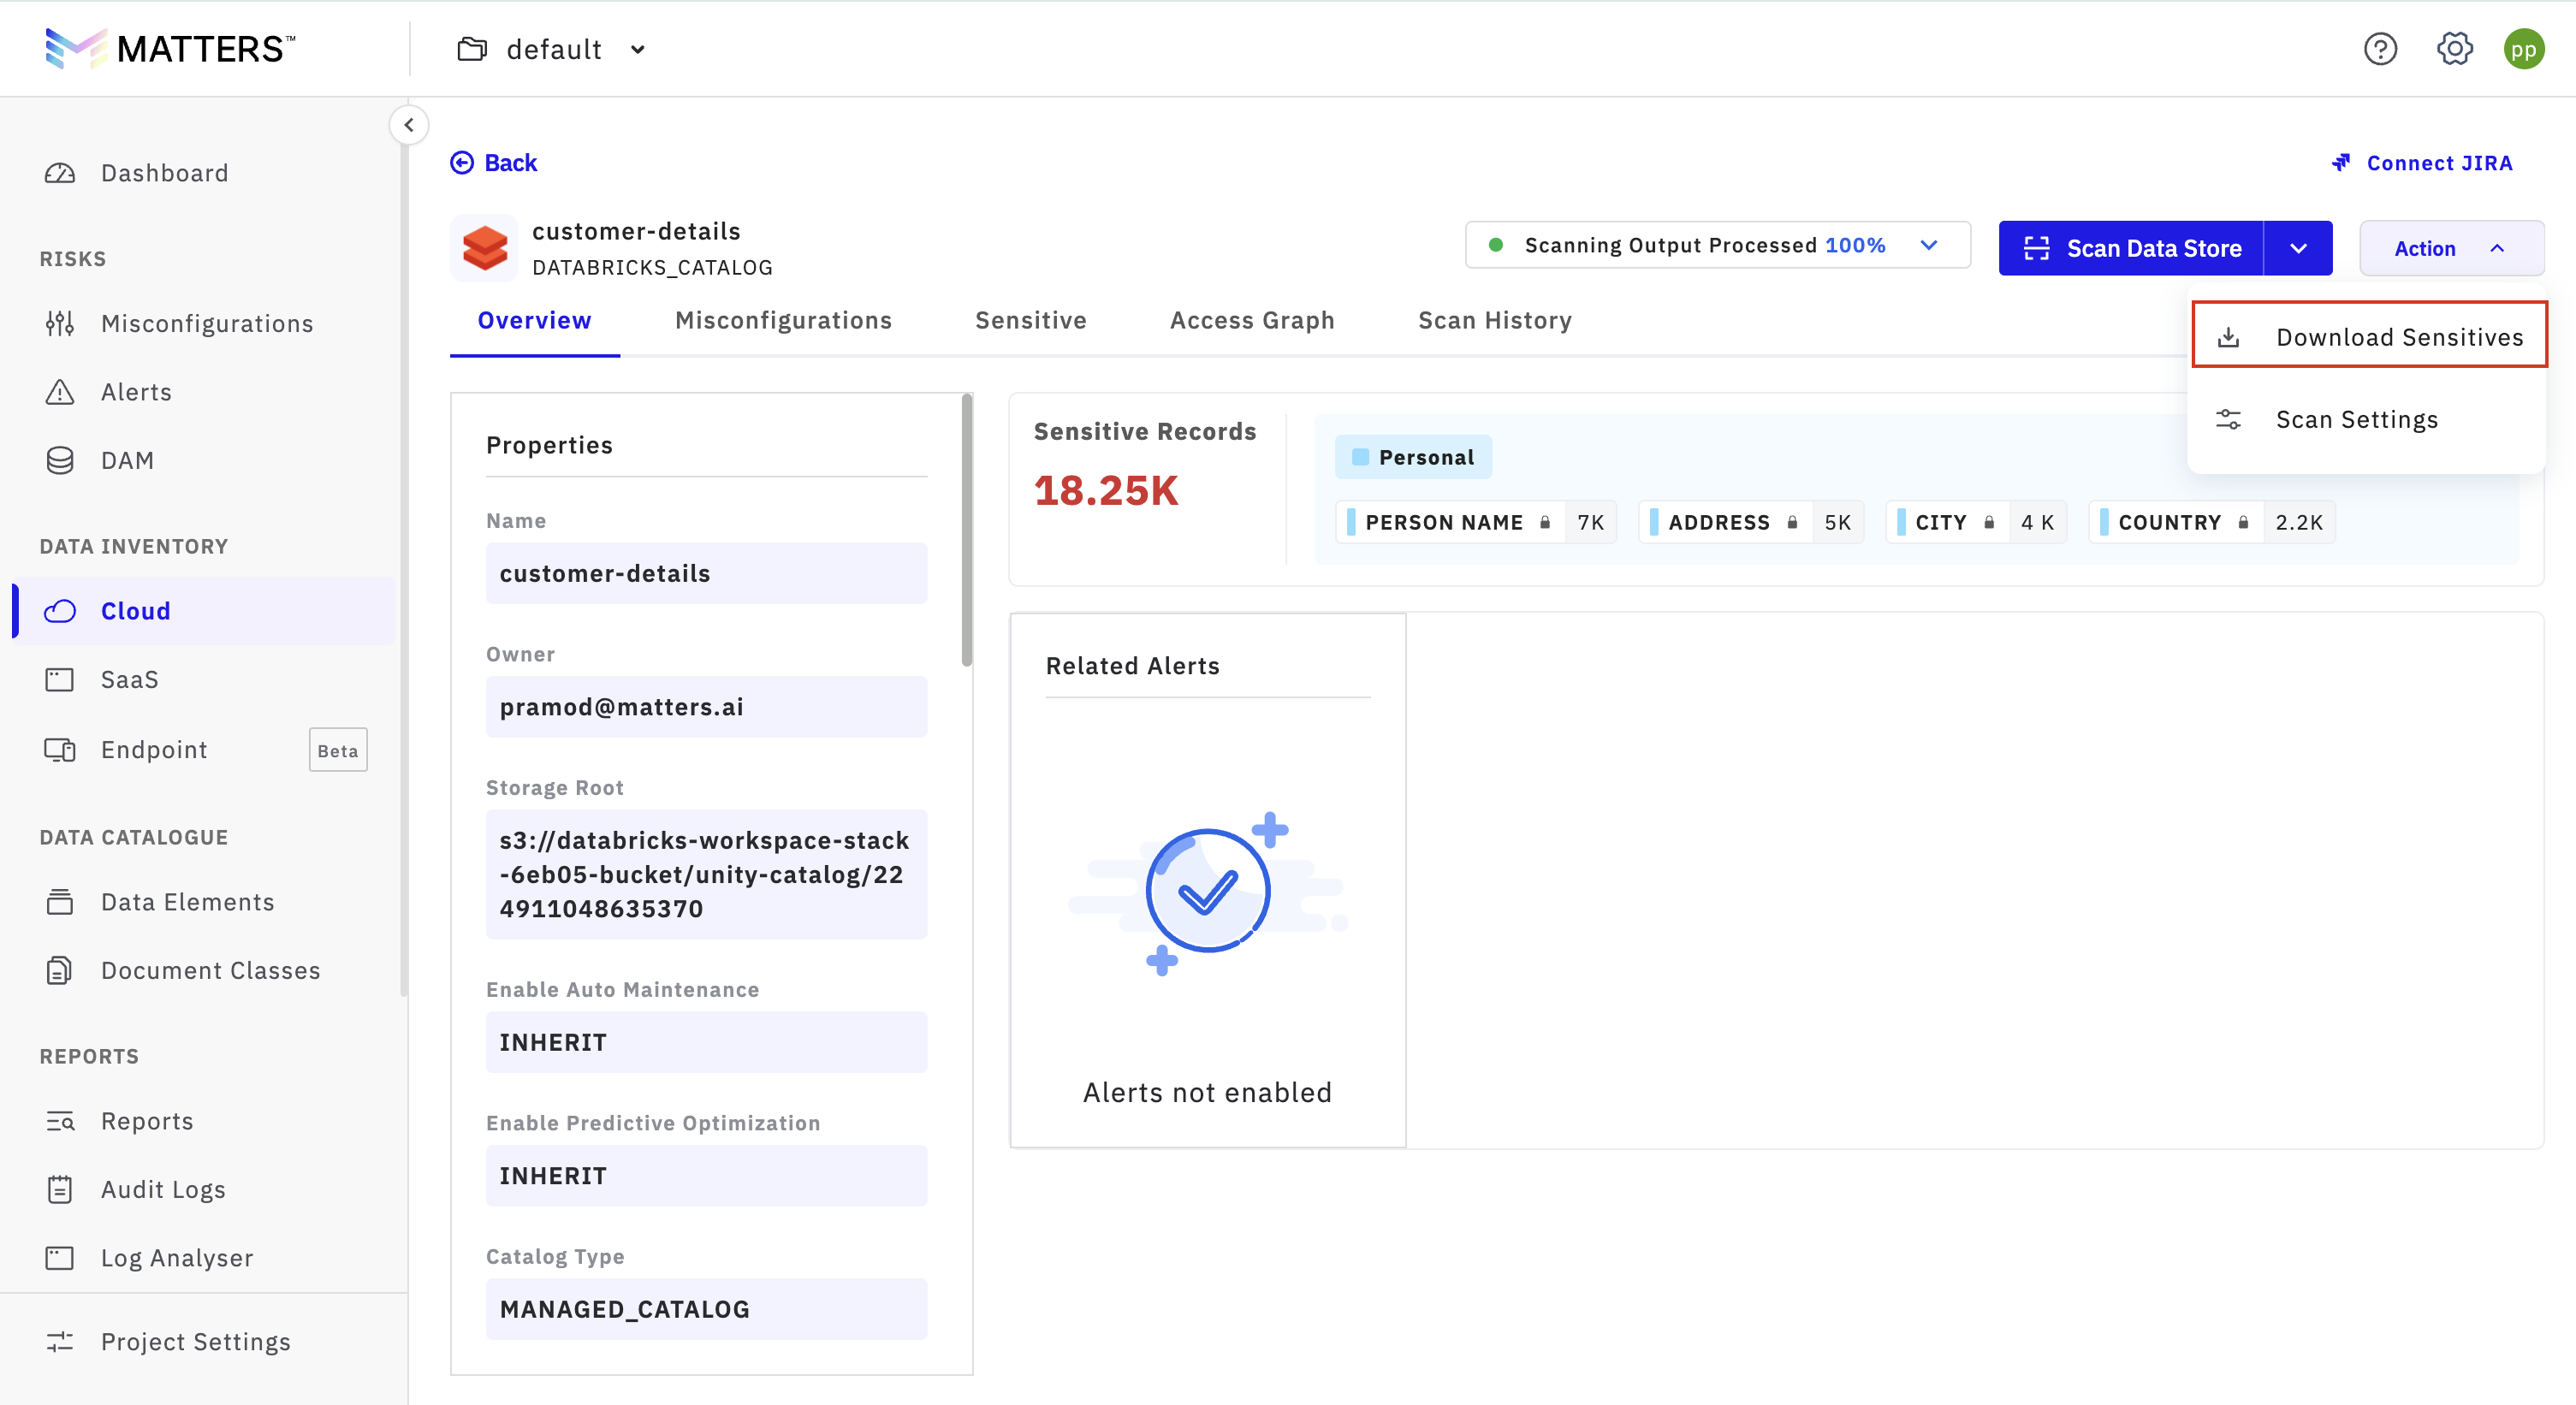
Click on Action and Select Scan Settings

Under Databases to scan Select the Schema you wish to run scans on , and click on Save Configuration

Click Scan Data Store to initiate detection of sensitive entities.

Step 9: Review Scan Results
After the scan is completed, navigate to the Overview page.
You will see detailed information on:
Account Properties
Sensitive Records Data

You can also view additional sensitivity details in the File View and Table View formats.

If any entities are found to be false positives, mark them by clicking on the False Positive button. This action allows you to manage the accuracy of the scan results.

You can view the false positives by toggling the “Show False Positive” Button at the top of the page.

Additionally, the Scan History section provides a detailed log of all previous scans, allowing for easy reference.
Additional Features:
Stop Scan:
At any stage of the scan, you can trigger the Stop Scan option if you wish to halt the process prematurely. This option can be useful for managing resources or stopping an incomplete scan.

Export Sensitivity Data to CSV:
After the scan is completed, you can download the sensitivity details in CSV format under Actions button. This feature allows you to export valuable insights and share them for further analysis or auditing purposes.
With everything set up, you can now use Matters to discover catalogs, run scans, and review sensitivity insights across your Databricks environment.