SMB Server Integration Guide
Last updated: May 18, 2026
This guide explains how to integrate your SMB server with the Matters platform. Once integrated, Matters can discover and classify sensitive data stored on your SMB shares.
Prerequisites
Three things must be in place before deployment begins.
1. Matters Assist Server
This is the server where the Matters Assist will be deployed and run as a Docker container. The Matters team will provide the deployment commands once all prerequisites are met.
Requirements for this server:
Docker is installed and running
Ensure the Assist VM has outbound access to the following:
2. SMB Server
This is the server hosting the SMB shares to be scanned. To ensure successful scanning, the SMB server must either:
Reside in the same private network as the Matters Assist Server, or
Have an explicit connection to the Matters Assist Server's IP address
Keep the following details handy — they will be required during configuration:
Server Address — run the command below on the SMB server to retrieve it:
(Get-NetIPConfiguration | Where-Object {$_.IPv4DefaultGateway -ne $null}).IPv4Address.IPAddressDomain — run the command below to retrieve it:
(Get-WmiObject Win32_ComputerSystem).DomainThe Matters Assist Server must have access to the SMB server on the following port:
3. Service Account
A service account must be created on the SMB server with the necessary permissions to access the shares to be scanned.
Required permissions:
Read access to all shares you want to scan
List folder contents
Read attributes and extended attributes
Important: When creating the service account, ensure "User must change password at next logon" is unchecked.
To create the service account:
Open Server Manager on the Windows server
Navigate to Tools → Computer Management → Local Users and Groups → Users
Right-click Users and select New User
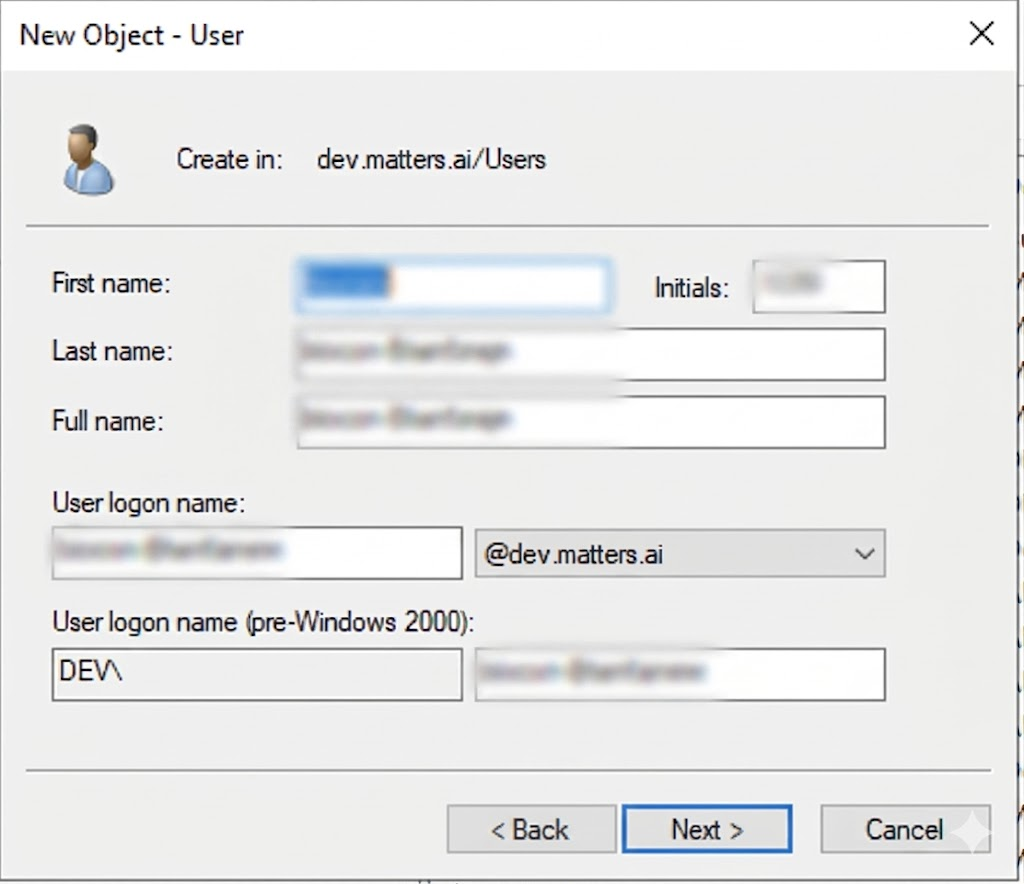
Fill in the username and password
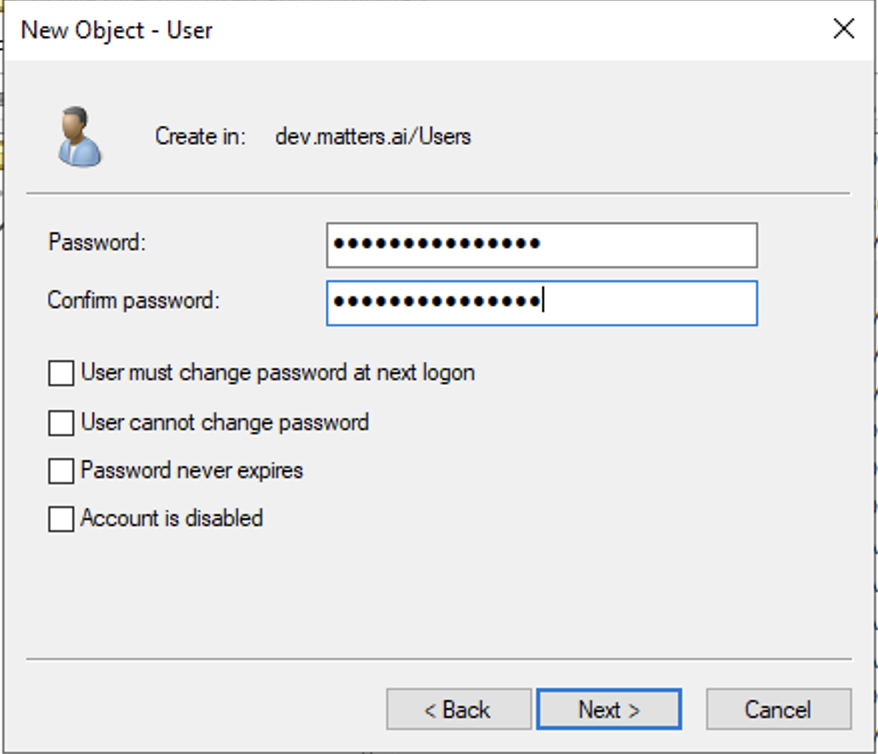
Uncheck "User must change password at next logon"
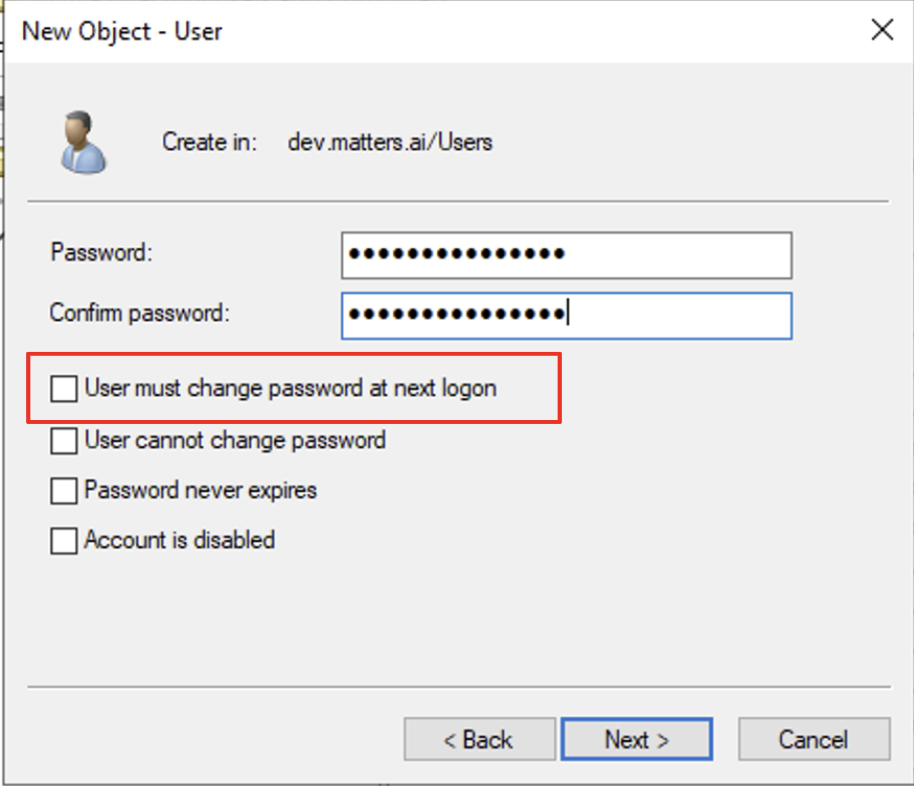
Click Create
Assign the user read permissions to the relevant SMB shares
Keep the username and password of this service account handy — they will be required during configuration.
1. Deploy the Matters Assist
The Matters Assist is a lightweight Docker-based service that runs on your infrastructure and facilitates secure communication between your SMB server and the Matters platform.
Step 1 — Get the Latest Version
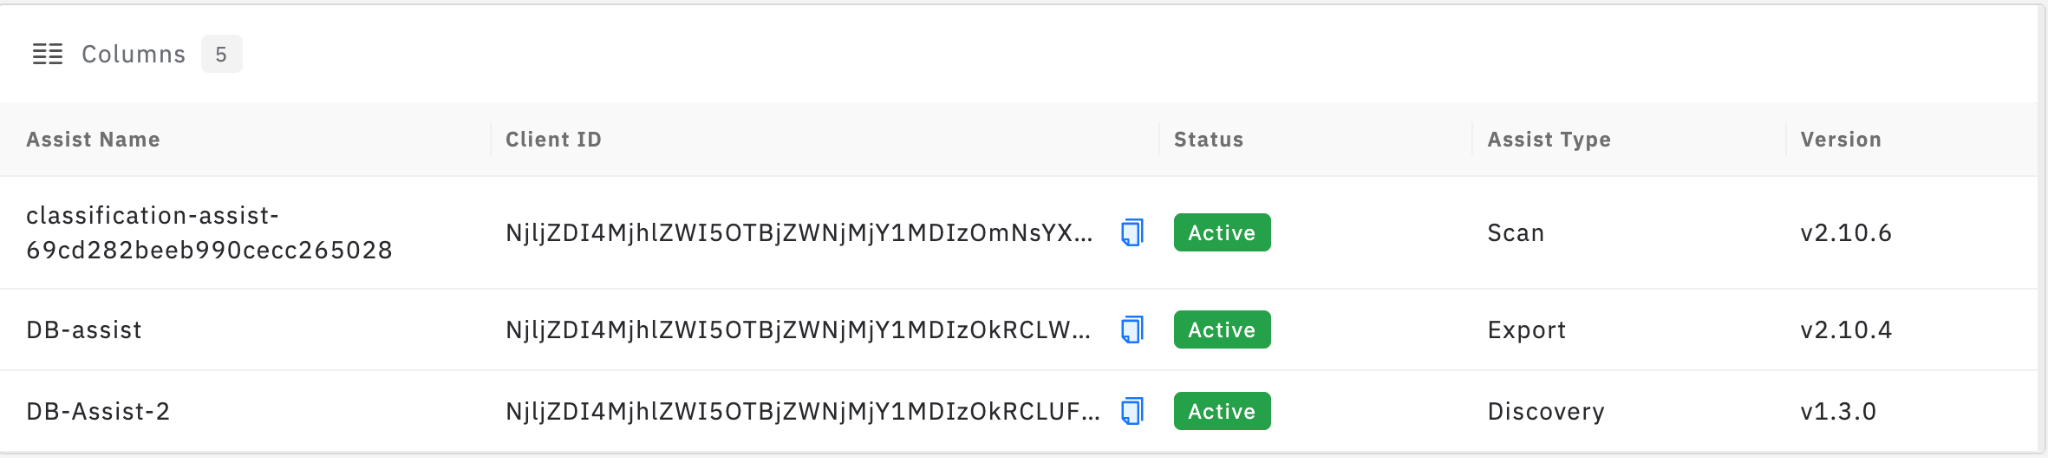
Fetch the latest image version for each service from the Matters team.
Note the latest version tag (e.g. v2.4.0) — you will use it in the configuration below.
Step 2 — Generate Credentials
Two separate sets of credentials are required — one for the Discovery Service and one for the Export Assist. Repeat the following for each:
Log in to app.matters.ai
Navigate to Management → Assists
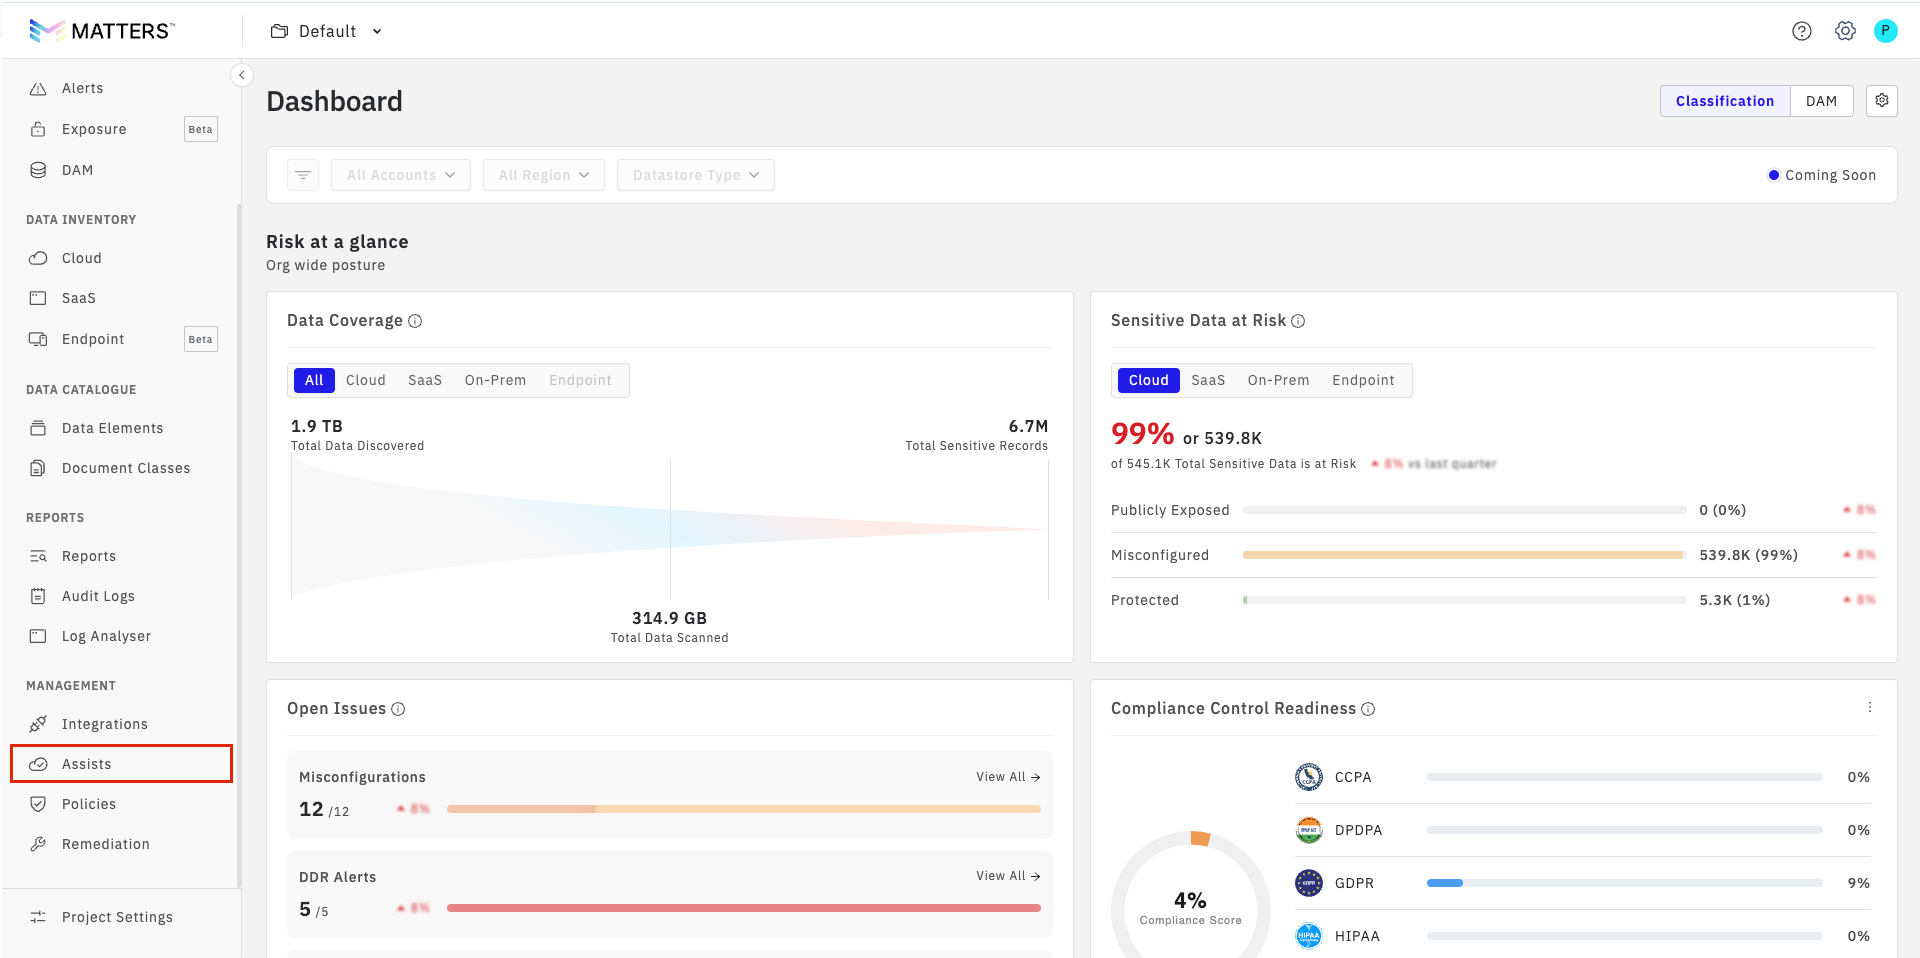
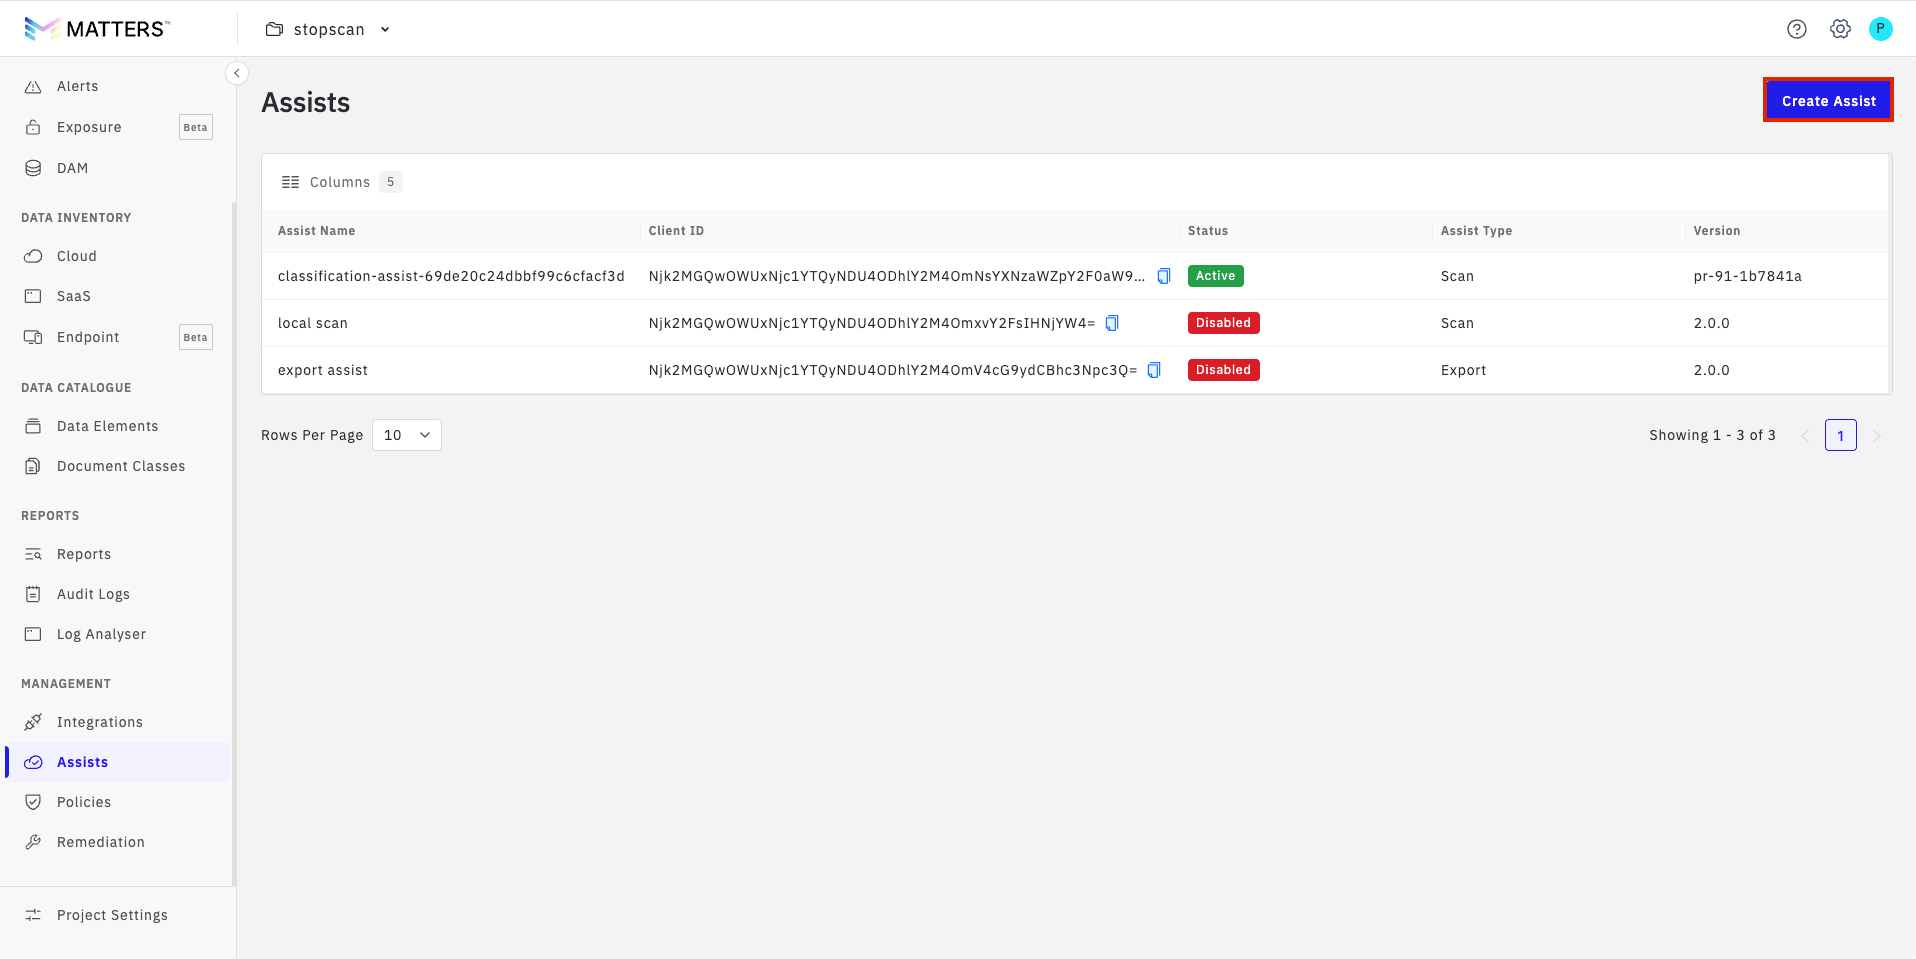
Click Create Assist
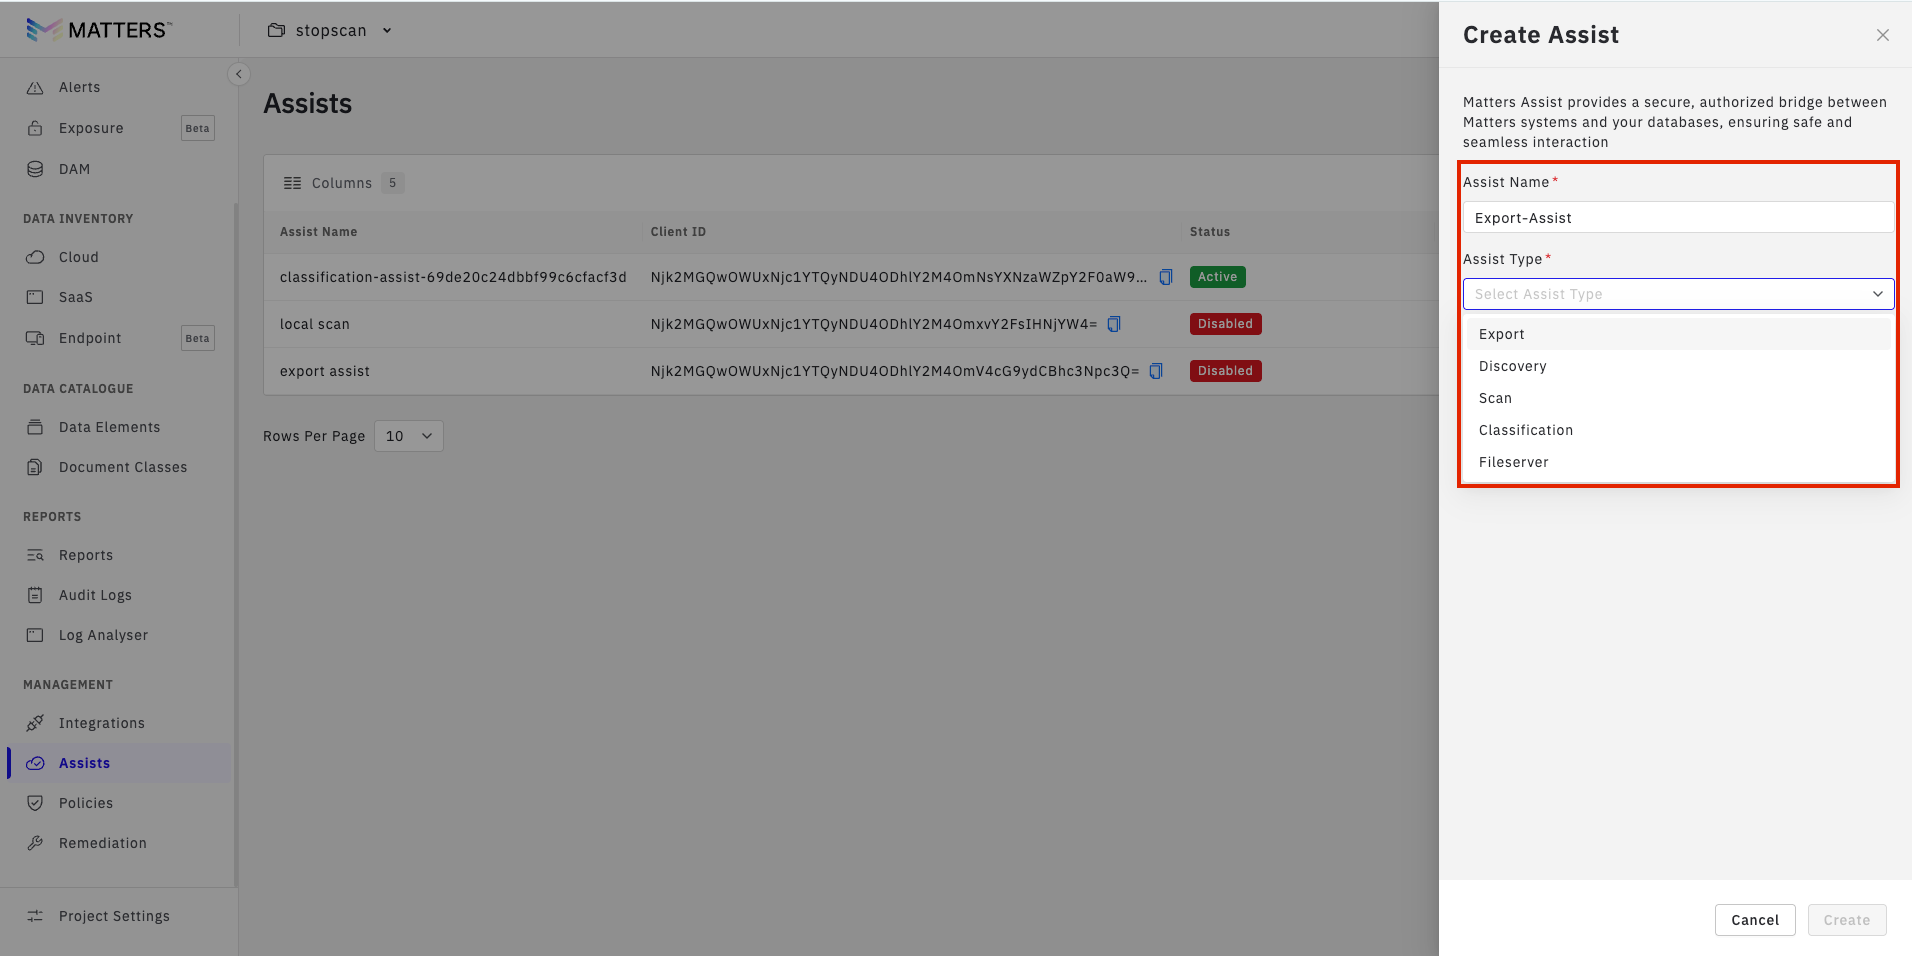
Select the Assist type: Discovery for the Discovery Service, Export for the Export Assist.
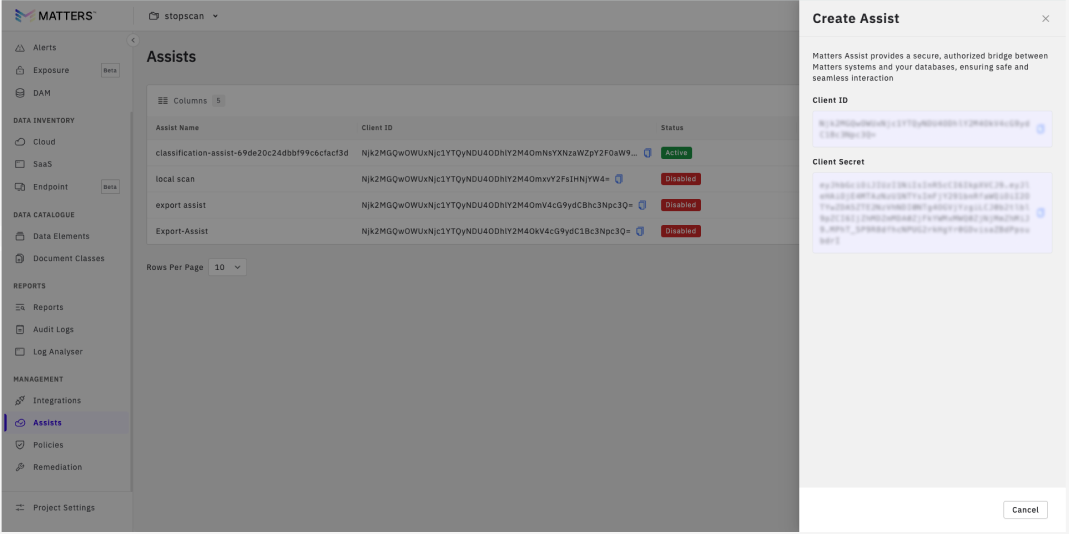
Copy the generated
CLIENT_IDandCLIENT_SECRET
Step 3 — Create the Docker Compose File
Create a file named docker-compose.yml in a directory of your choice and paste the configuration below.
Placeholders: All values wrapped in [ ] must be replaced before deploying. Refer to the table below.
version: '[latest-version]'
services:
  discovery-service:
    image: ghcr.io/matters-ai/discovery-service:v[latest-version]
    container_name: matters-discovery-service
    restart: always
    environment:
      AWS_REGION: <your-region>
      HARMONY_BASE_URL: <https://app.matters.ai>
      CLIENT_NAME: Matters-Discovery-Assist
      CLIENT_ID: [discovery-client-id]
      CLIENT_SECRET: [discovery-client-secret]
      SPRING_PROFILES_ACTIVE: prod
      JAVA_OPTS: "-XX:+UseContainerSupport -XX:MaxRAMPercentage=75.0"
      SECRETS_SERVICE_URL: <https://app.matters.ai/api/secrets-service>
      APP_ONPREM_ENABLED: true
      VERSION: v[latest-version]
      NEW_RELIC_HOST: cubeapm-metrics.gcp.matters.ai

  specter:
    image: ghcr.io/matters-ai/specter:v[latest-version]
    container_name: matters-export-assist
    restart: always
    environment:
      HARMONY_BASE_URL: <https://app.matters.ai>
      CLIENT_NAME: Matters-Export-Assist
      CLIENT_ID: [export-client-id]
      CLIENT_SECRET: [export-client-secret]
      SPRING_PROFILES_ACTIVE: prod
      KUBERNETES_ENABLED: false
      PROXY_ENABLED: false
      VERSION: v[latest-version]
      NEW_RELIC_HOST: cubeapm-metrics.gcp.matters.ai
Placeholder reference:
Placeholder | Description |
|---|---|
[latest-version] | Latest version for Discovery and Export services from Matters team— replace in version, VERSION, and all image tags |
[your-region] | AWS region of your deployment (e.g. us-east-1) |
[discovery-client-id] | CLIENT_ID generated for the Discovery Assist in Step 2 |
[discovery-client-secret] | CLIENT_SECRET generated for the Discovery Assist in Step 2 |
[export-client-id] | CLIENT_ID generated for the Export Assist in Step 2 |
[export-client-secret] | CLIENT_SECRET generated for the Export Assist in Step 2 |
Step 4 — Authenticate with the Container Registry
Run the following command to authenticate Docker with the GitHub Container Registry. Replace [GHCR_Credentials] with the credentials provided by Matters:
echo "[GHCR_Credentials]" | docker login ghcr.io -u matters-deploybot --password-stdin
Step 5 — Deploy the Assist
From the directory containing your docker-compose.yml, run:
docker compose up -d
Step 6 — Verify
Go to app.matters.ai → Management → Assists and confirm both Assists show as 🟢 Online.
2. Configure SMB Integration in Matters
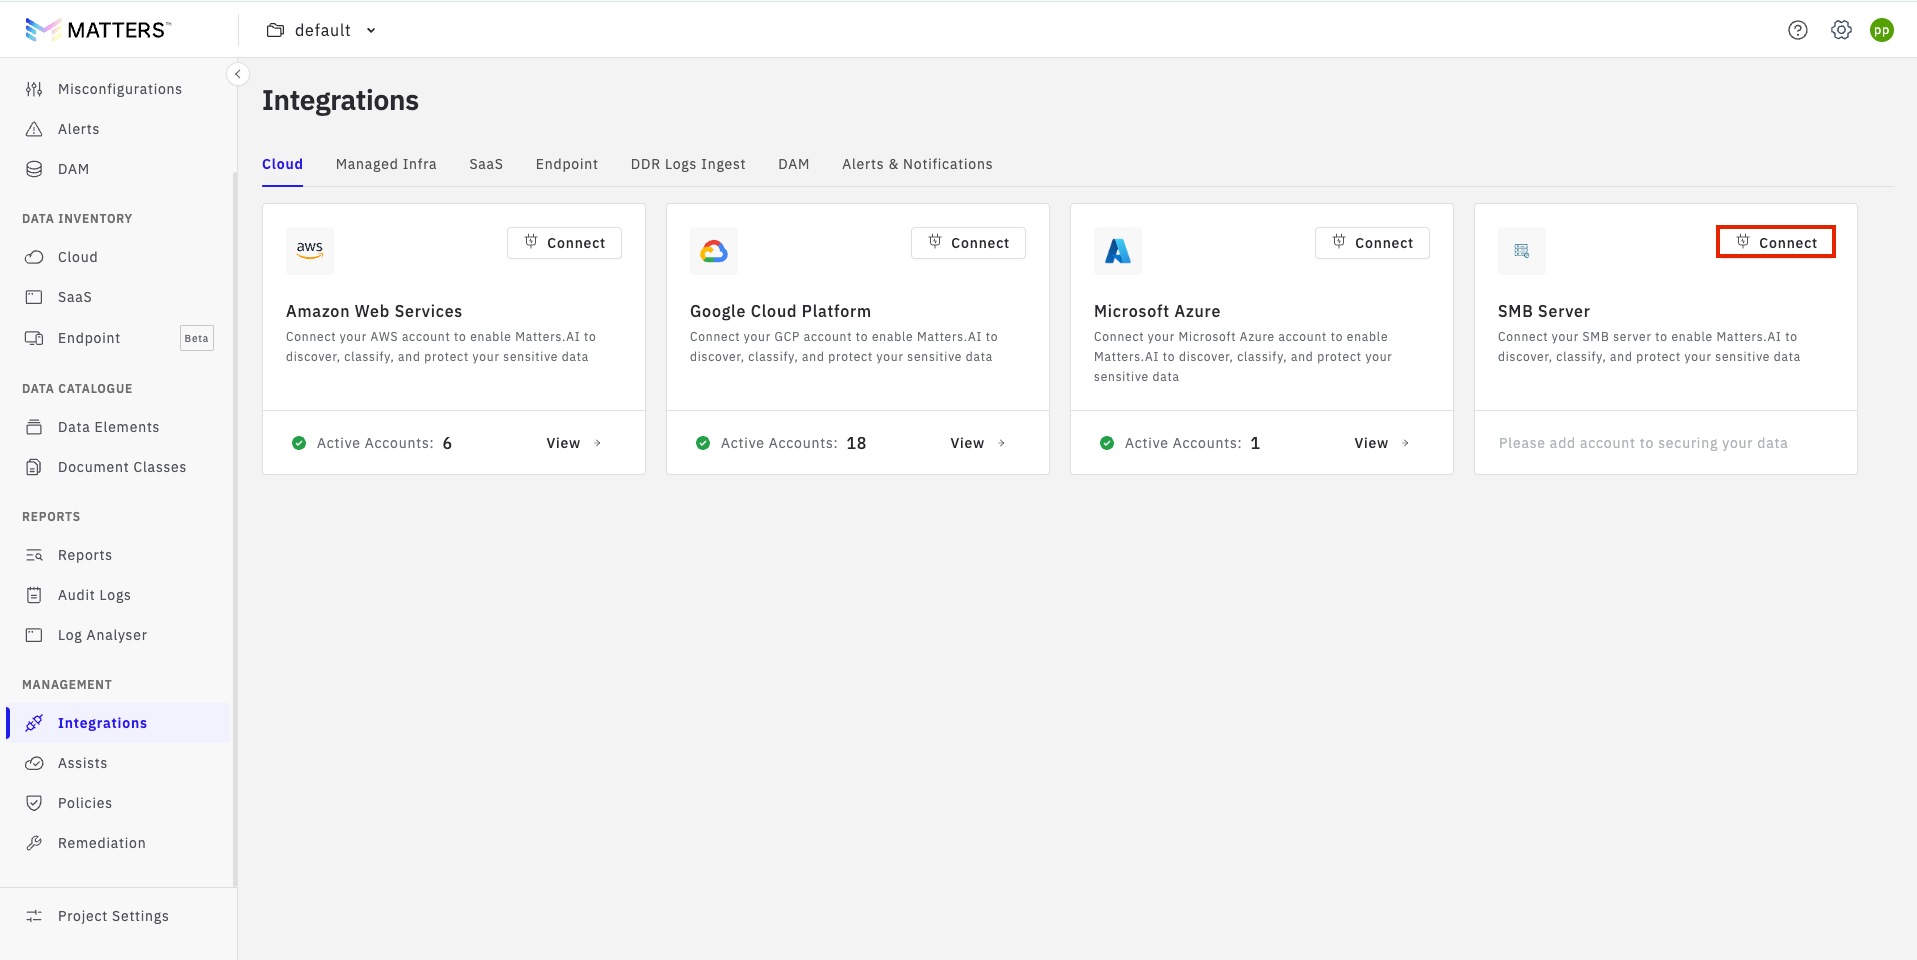
Step 1 — Navigate to Integrations
Log in to the Matters Console with a Super Admin account
Navigate to Integrations → Cloud (Direct URL: https://app.matters.ai/data-security/integrations?type=cloud — if using a dedicated tenant, replace app with your tenant name)
Click Connect on the SMB Server integration card:
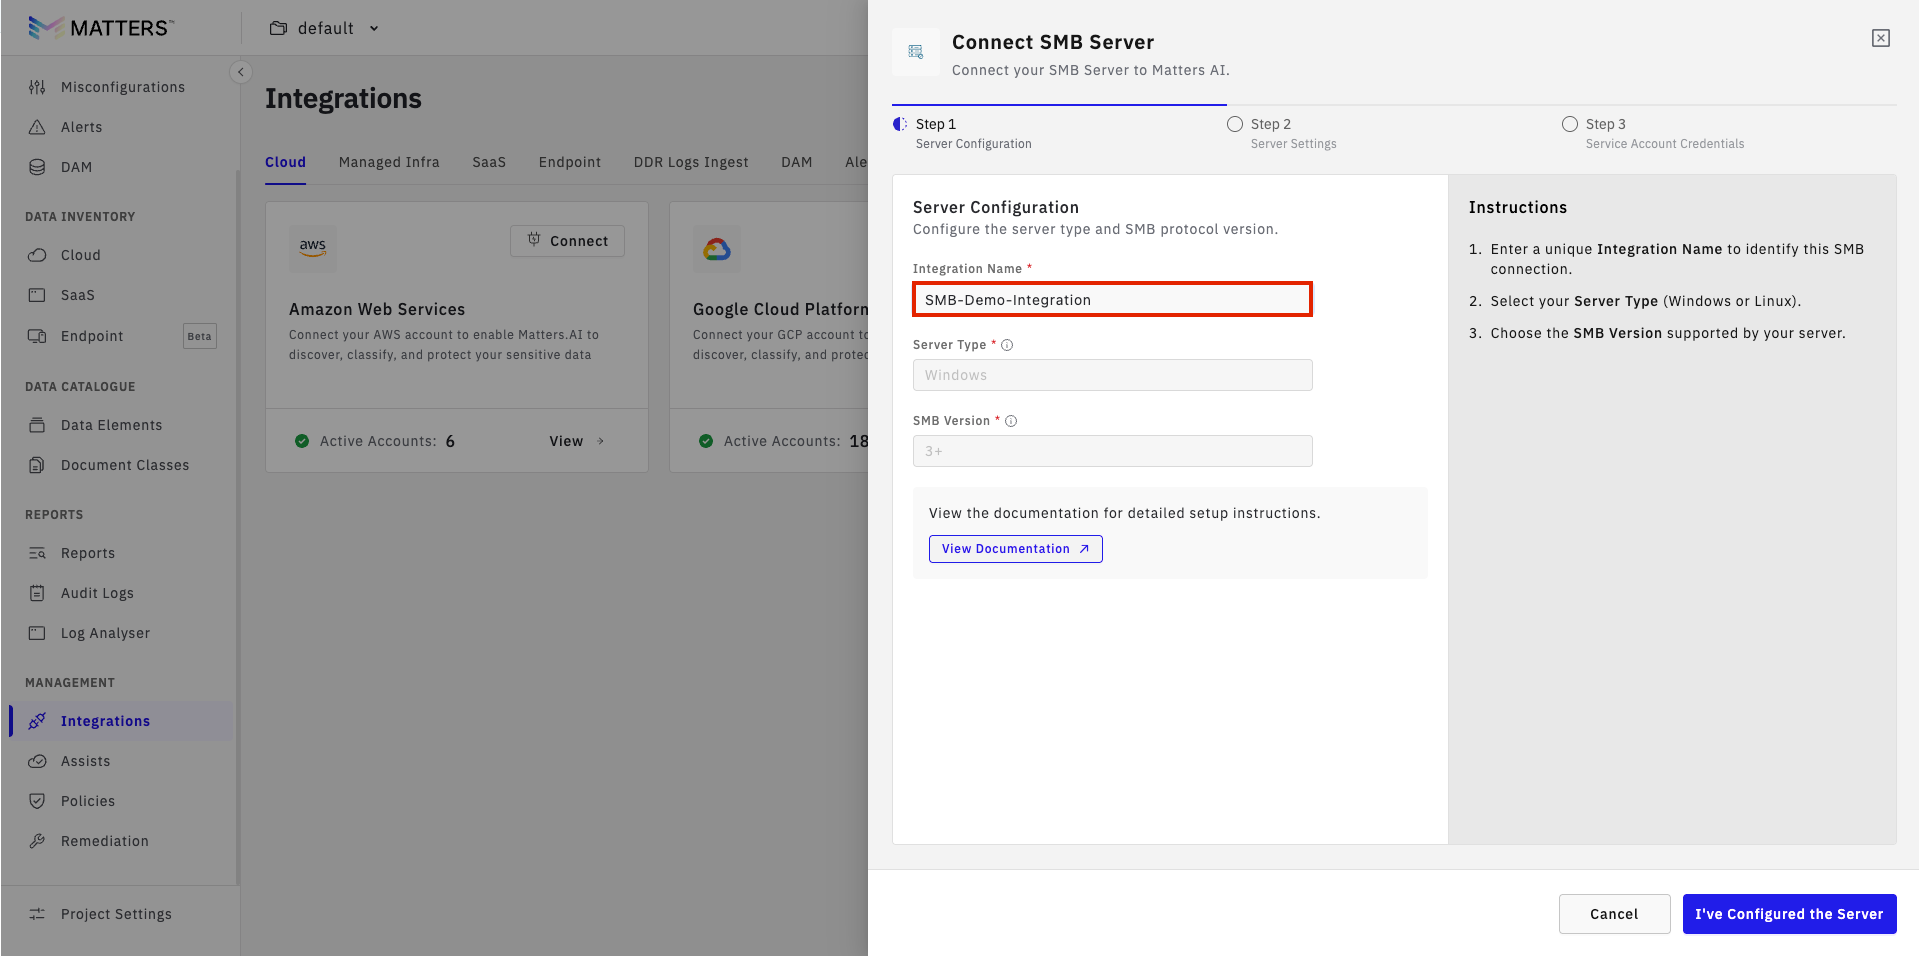
Step 2: Enter Integration Details
In the Integration Name field, enter a clear name that identifies the server or environment.
Examples:
SMB-Demo-IntegrationClick I’ve Configured the Server.
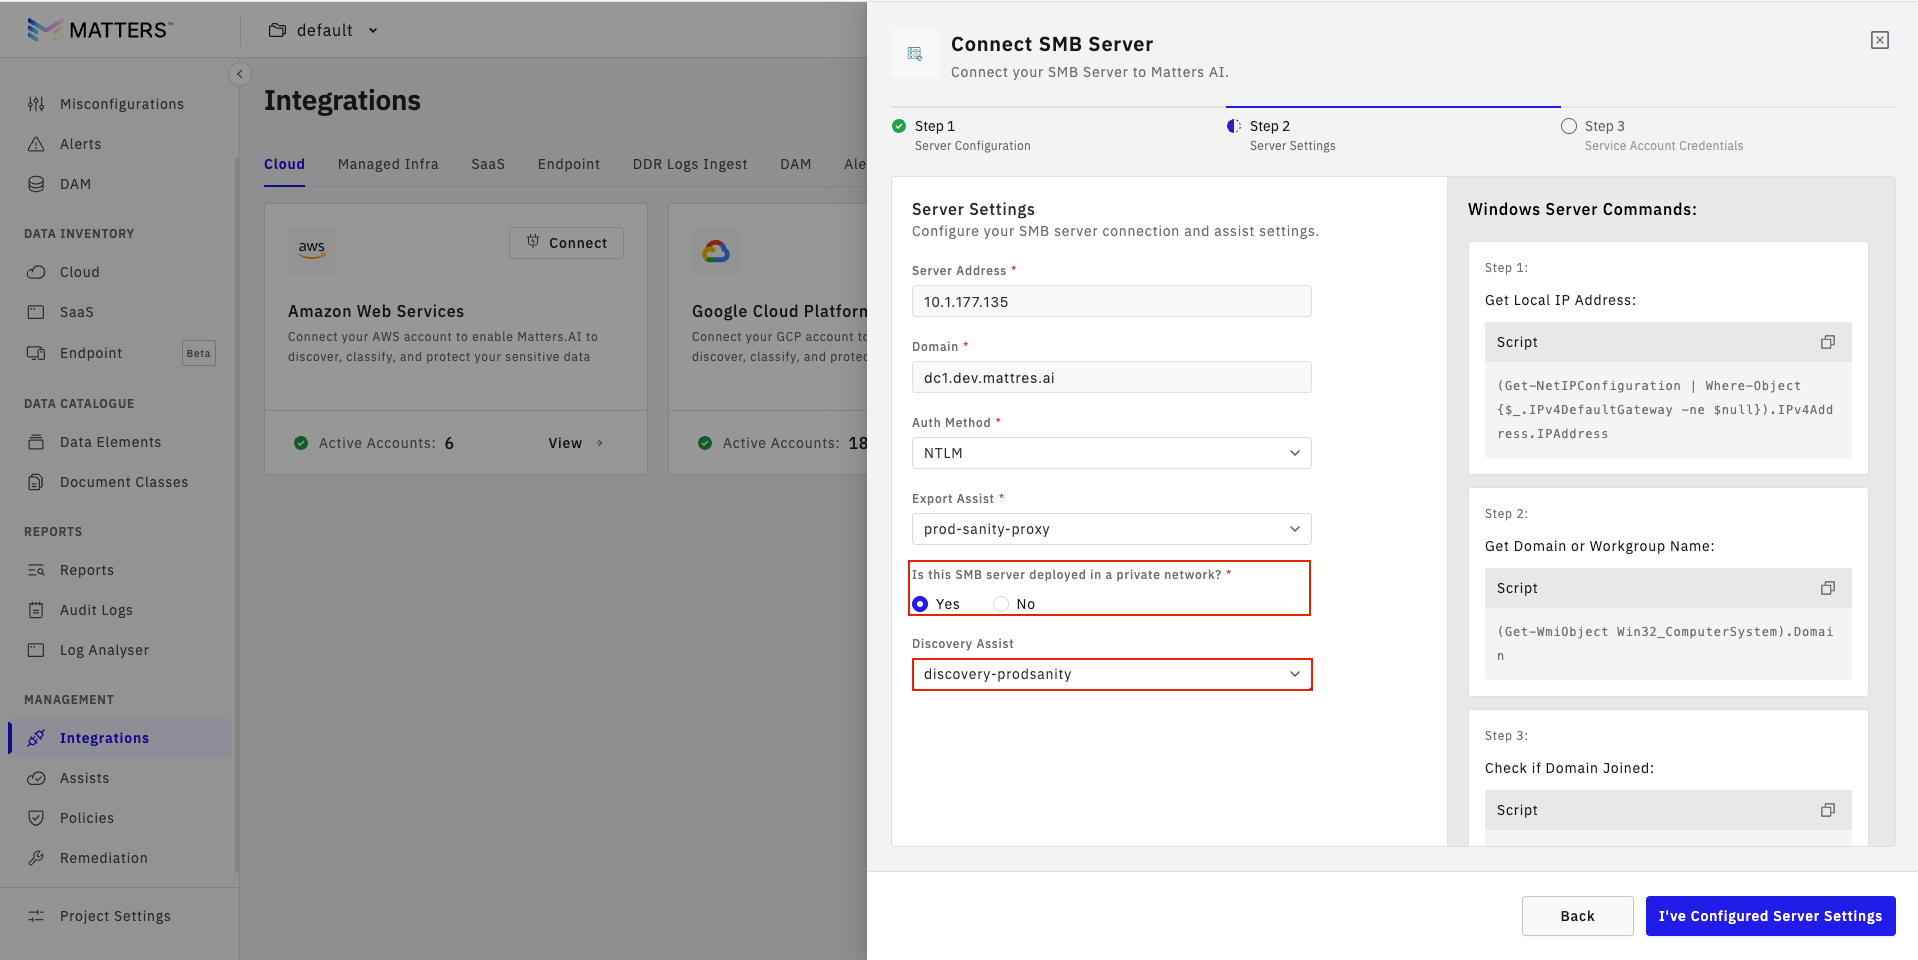
Step 3: Configure SMB Server Settings
Enter the following details:
Server Address(IP address of the SMB server ,retrieved in Prerequisites)
Domain Name(Domain of the SMB server)
Authentication Method (Select from:
Kerberos with NTLM Fallback(recommended) orNTLM)Select Export Assist from Dropdown
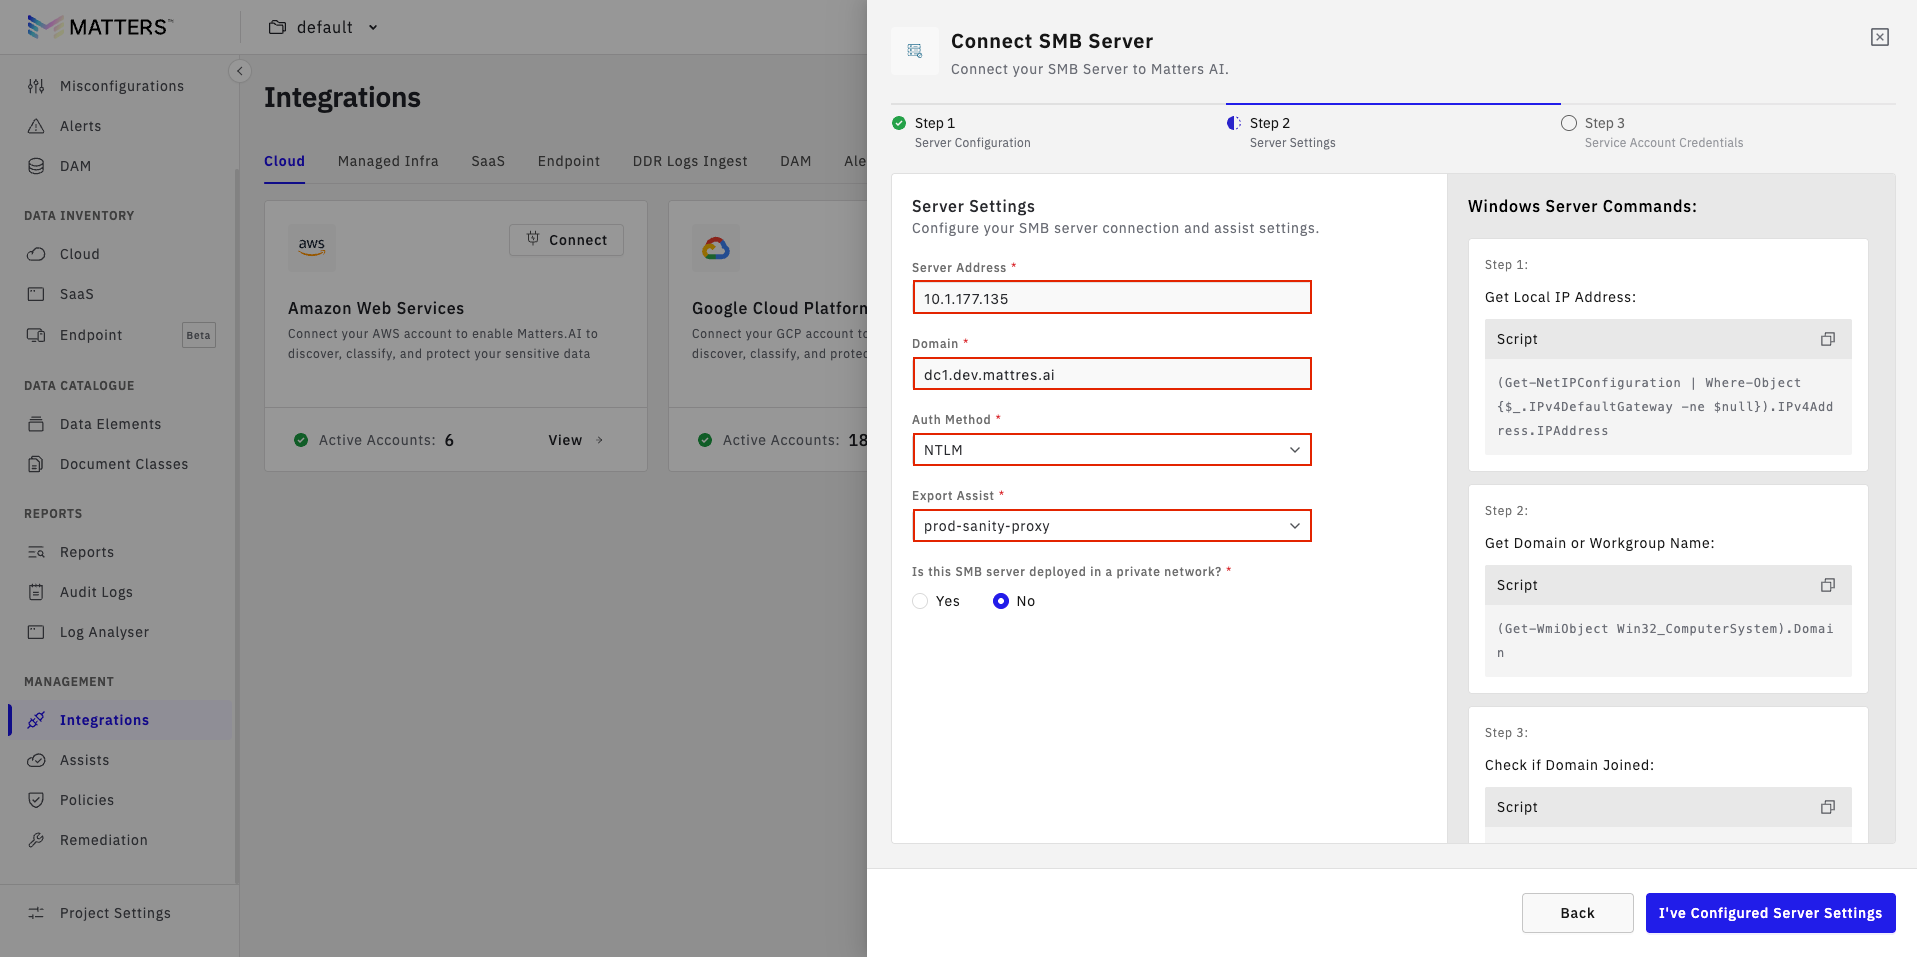
If the SMB server is deployed in a private network:
Select Yes
Choose the appropriate Discovery Assist from the dropdown
Click I’ve Configured Server Settings
If the SMB server is not deployed in a private network:
Select No
Click I’ve Configured Server Settings
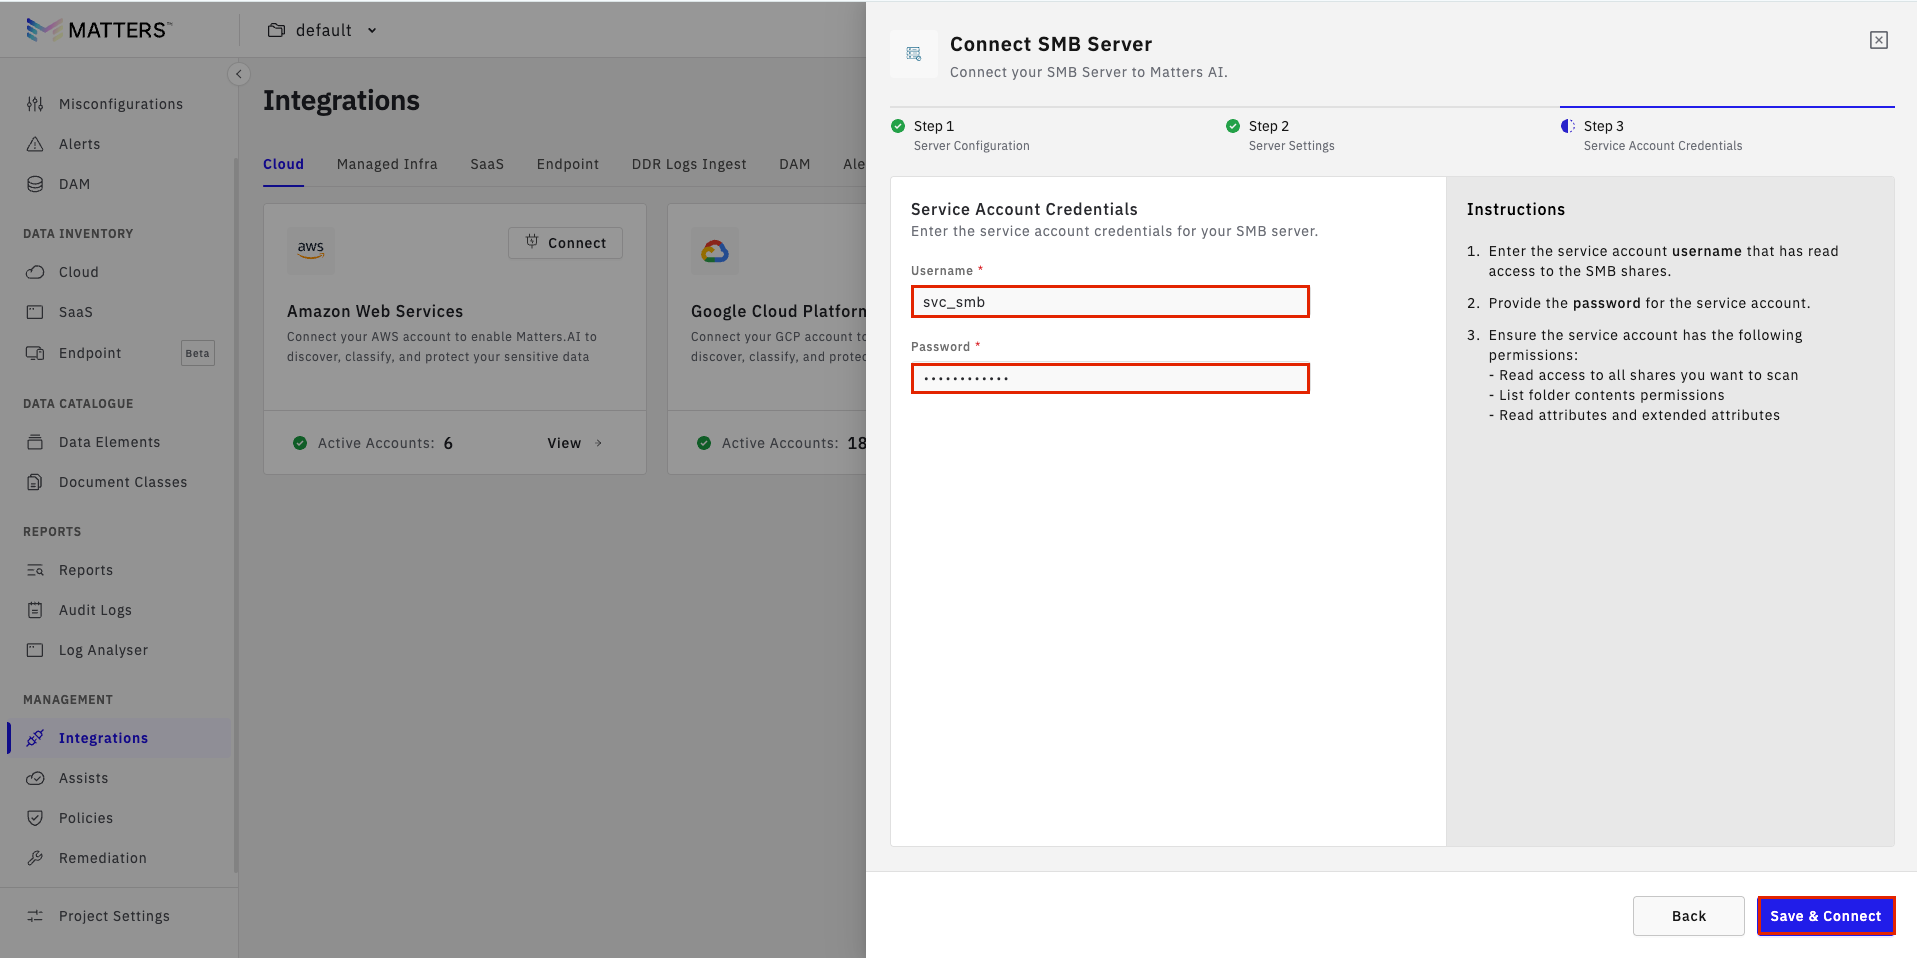
Step 4: Enter Credentials and Connect
Enter the SMB server username and password.
Click Save & Connect.
Confirm the account has the following permissions:
Read access to all shares to be scanned
List folder contents
Read attributes and extended attributes
Step 5: Verify the Integration
After clicking Save & Connect, the Matters Console should display a success message similar to:
Integration Successful. Your SMB Server has been successfully connected. Data discovery and classification will now begin.
This confirms that the SMB server has been successfully integrated with Matters.AI.
Step 6: Discover Data Stores
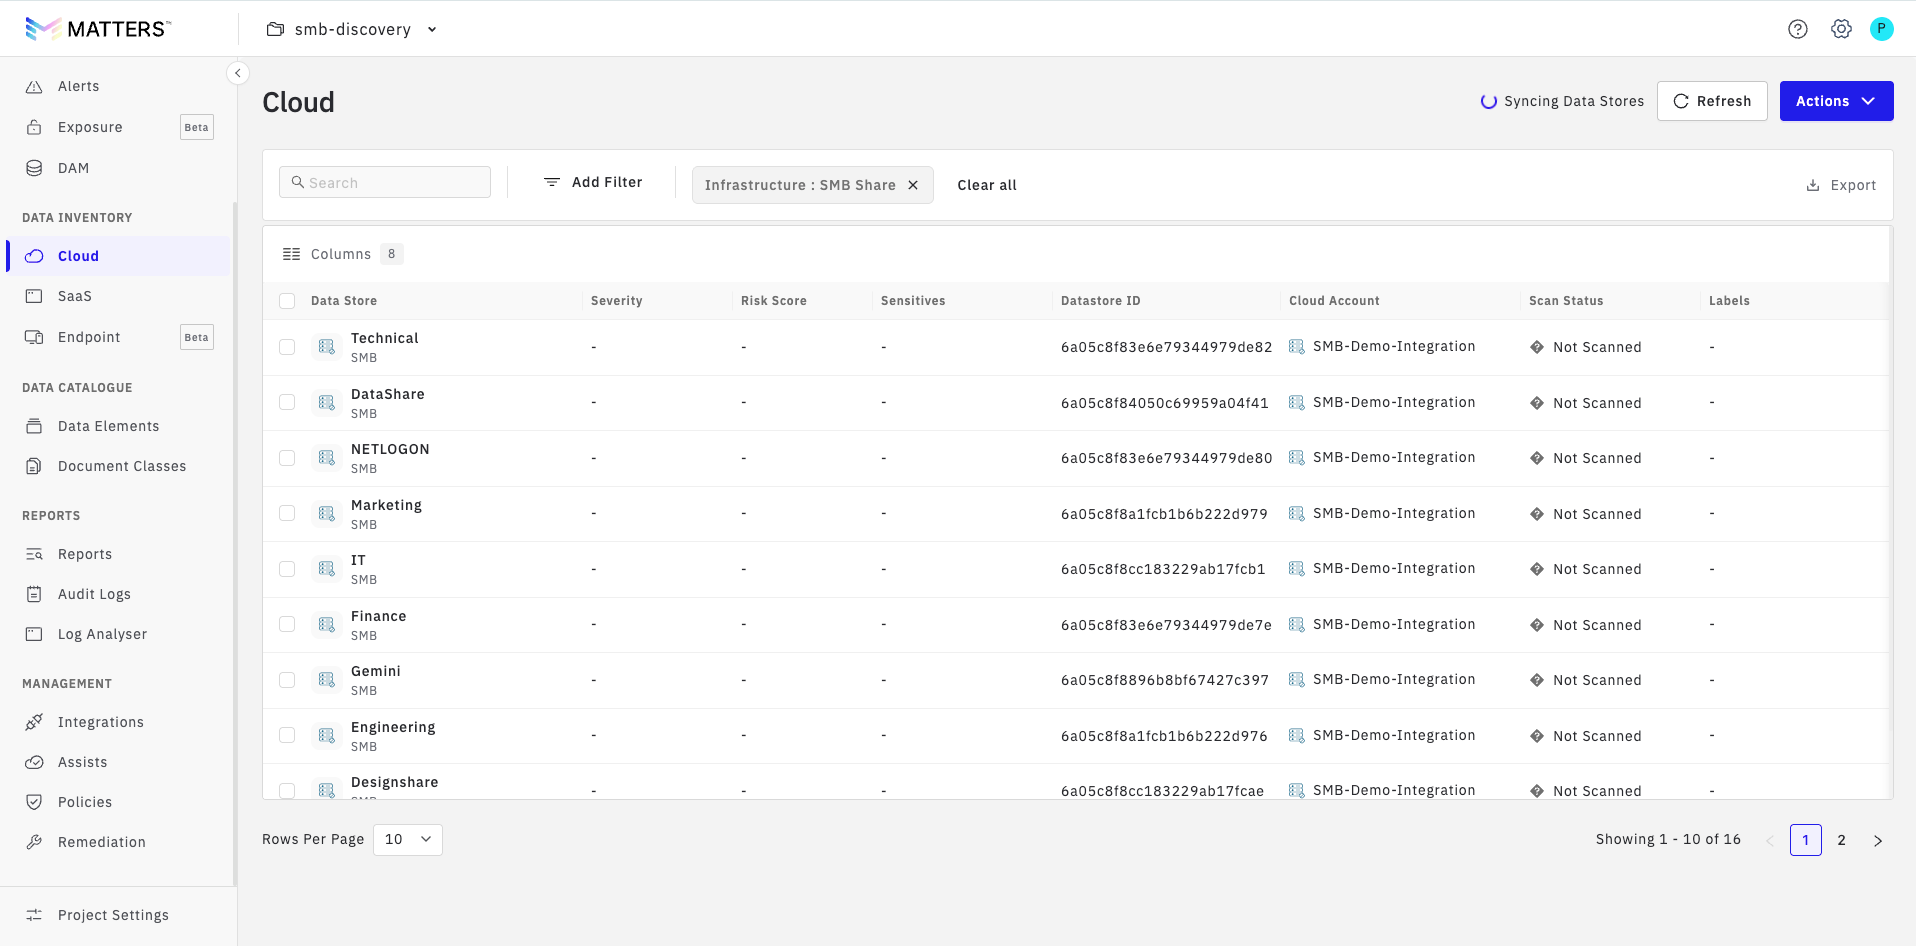
After the SMB server is successfully integrated, all available shares are automatically discovered and listed under Cloud Inventory.
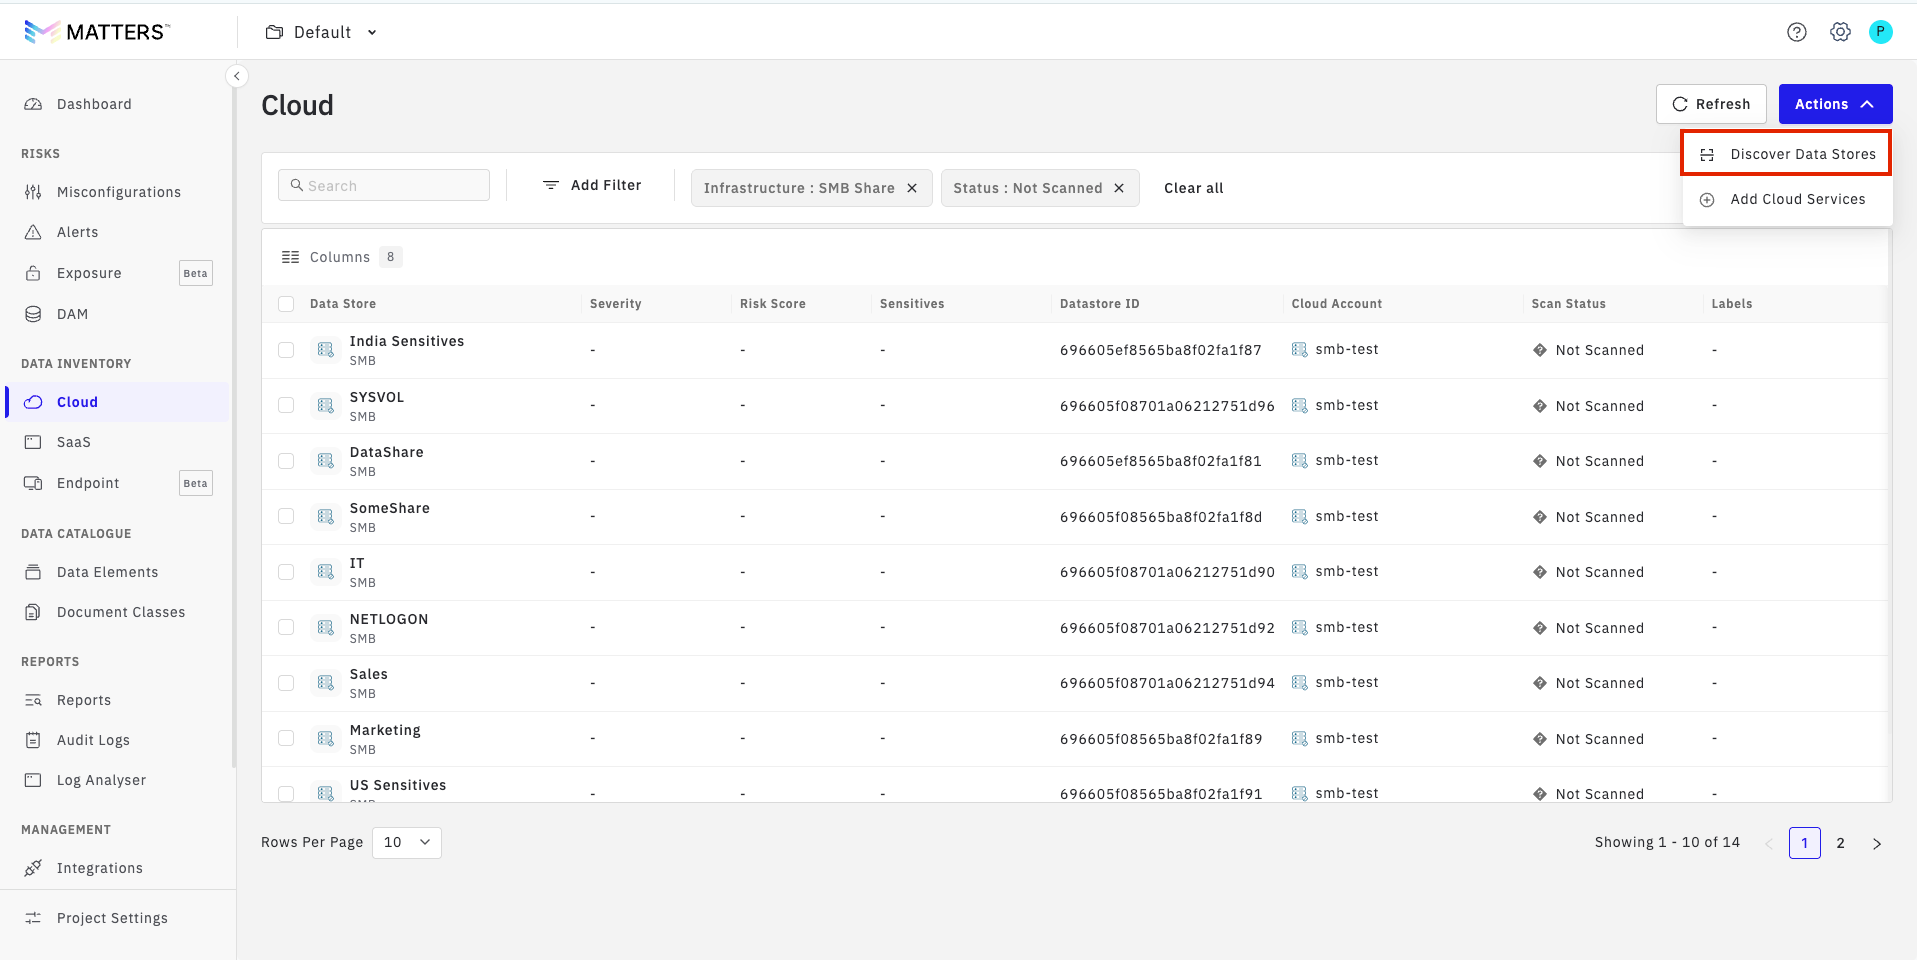
You can also start discovery manually:
Go to the Cloud Inventory.
Click Actions.
Select Discover Data Stores.
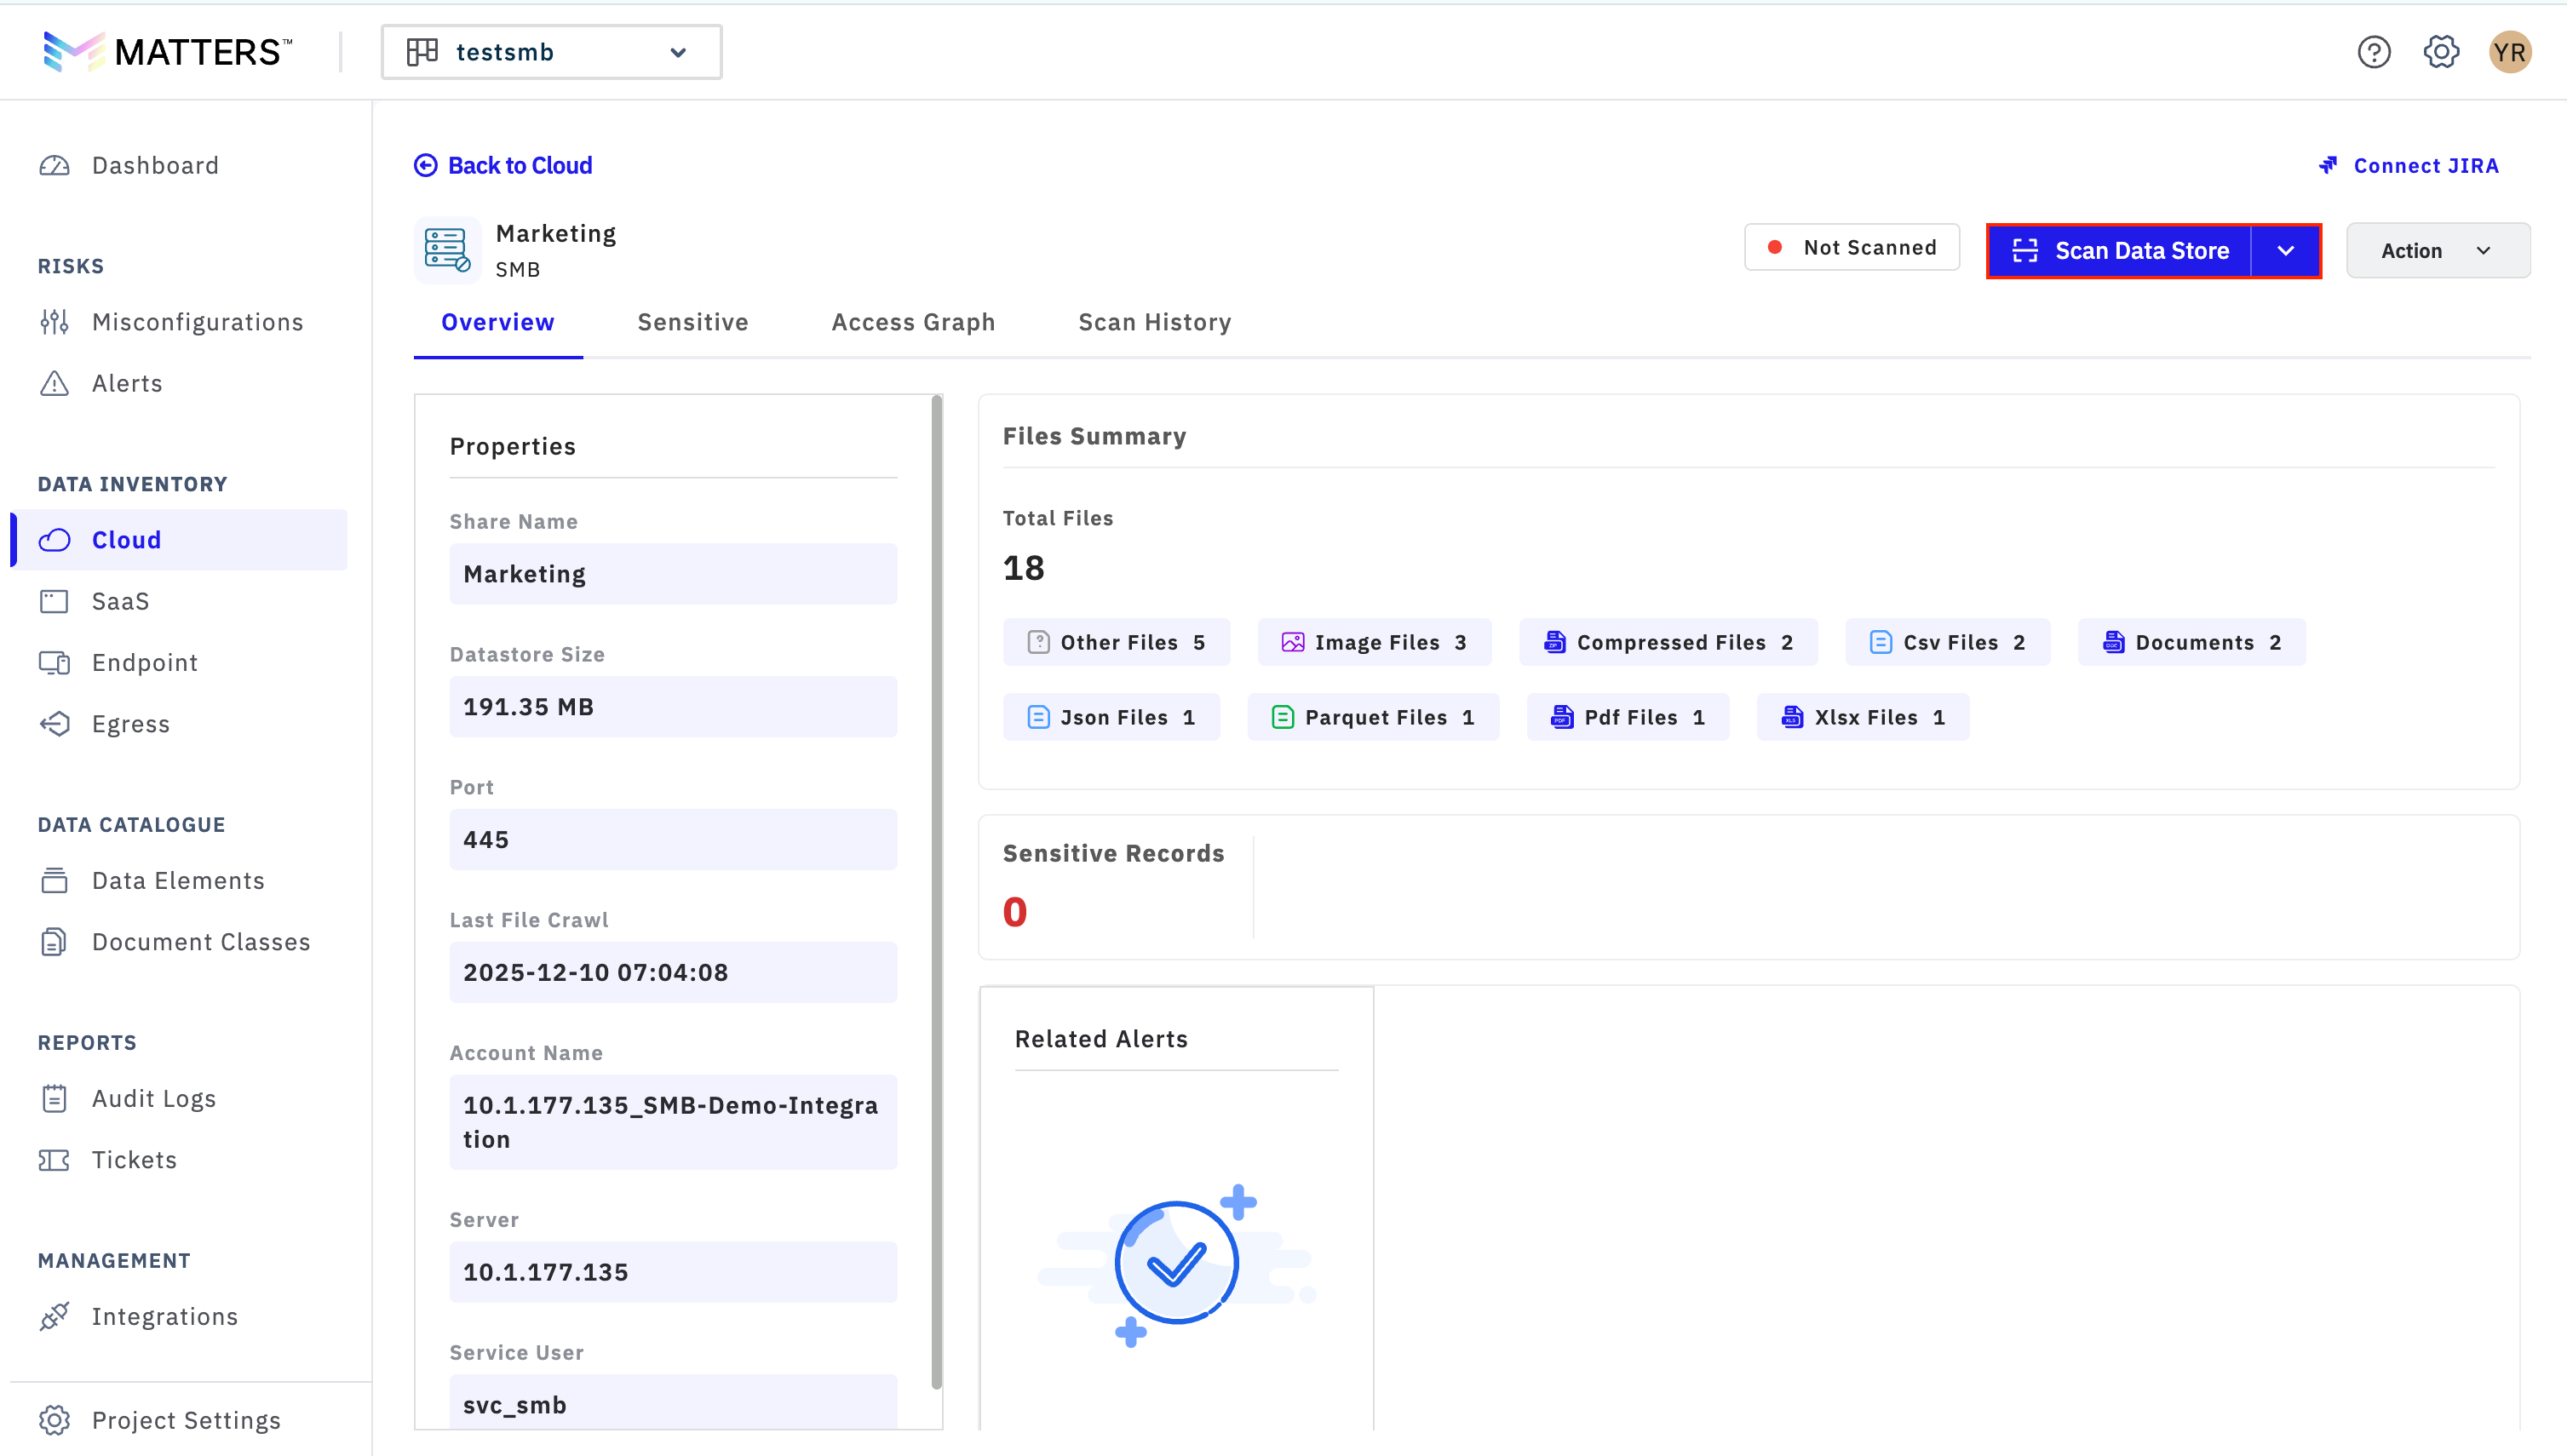
Step 7: Run a Classification Scan
Click the share on which you want to run a classification scan.
Click Scan Data Store.
Monitor the scan progress from the console.
Step 8: Review Scan Results
After the scan is completed, navigate to the Overview page.
You will see detailed information, including:
Account Properties
Sensitive Records Data
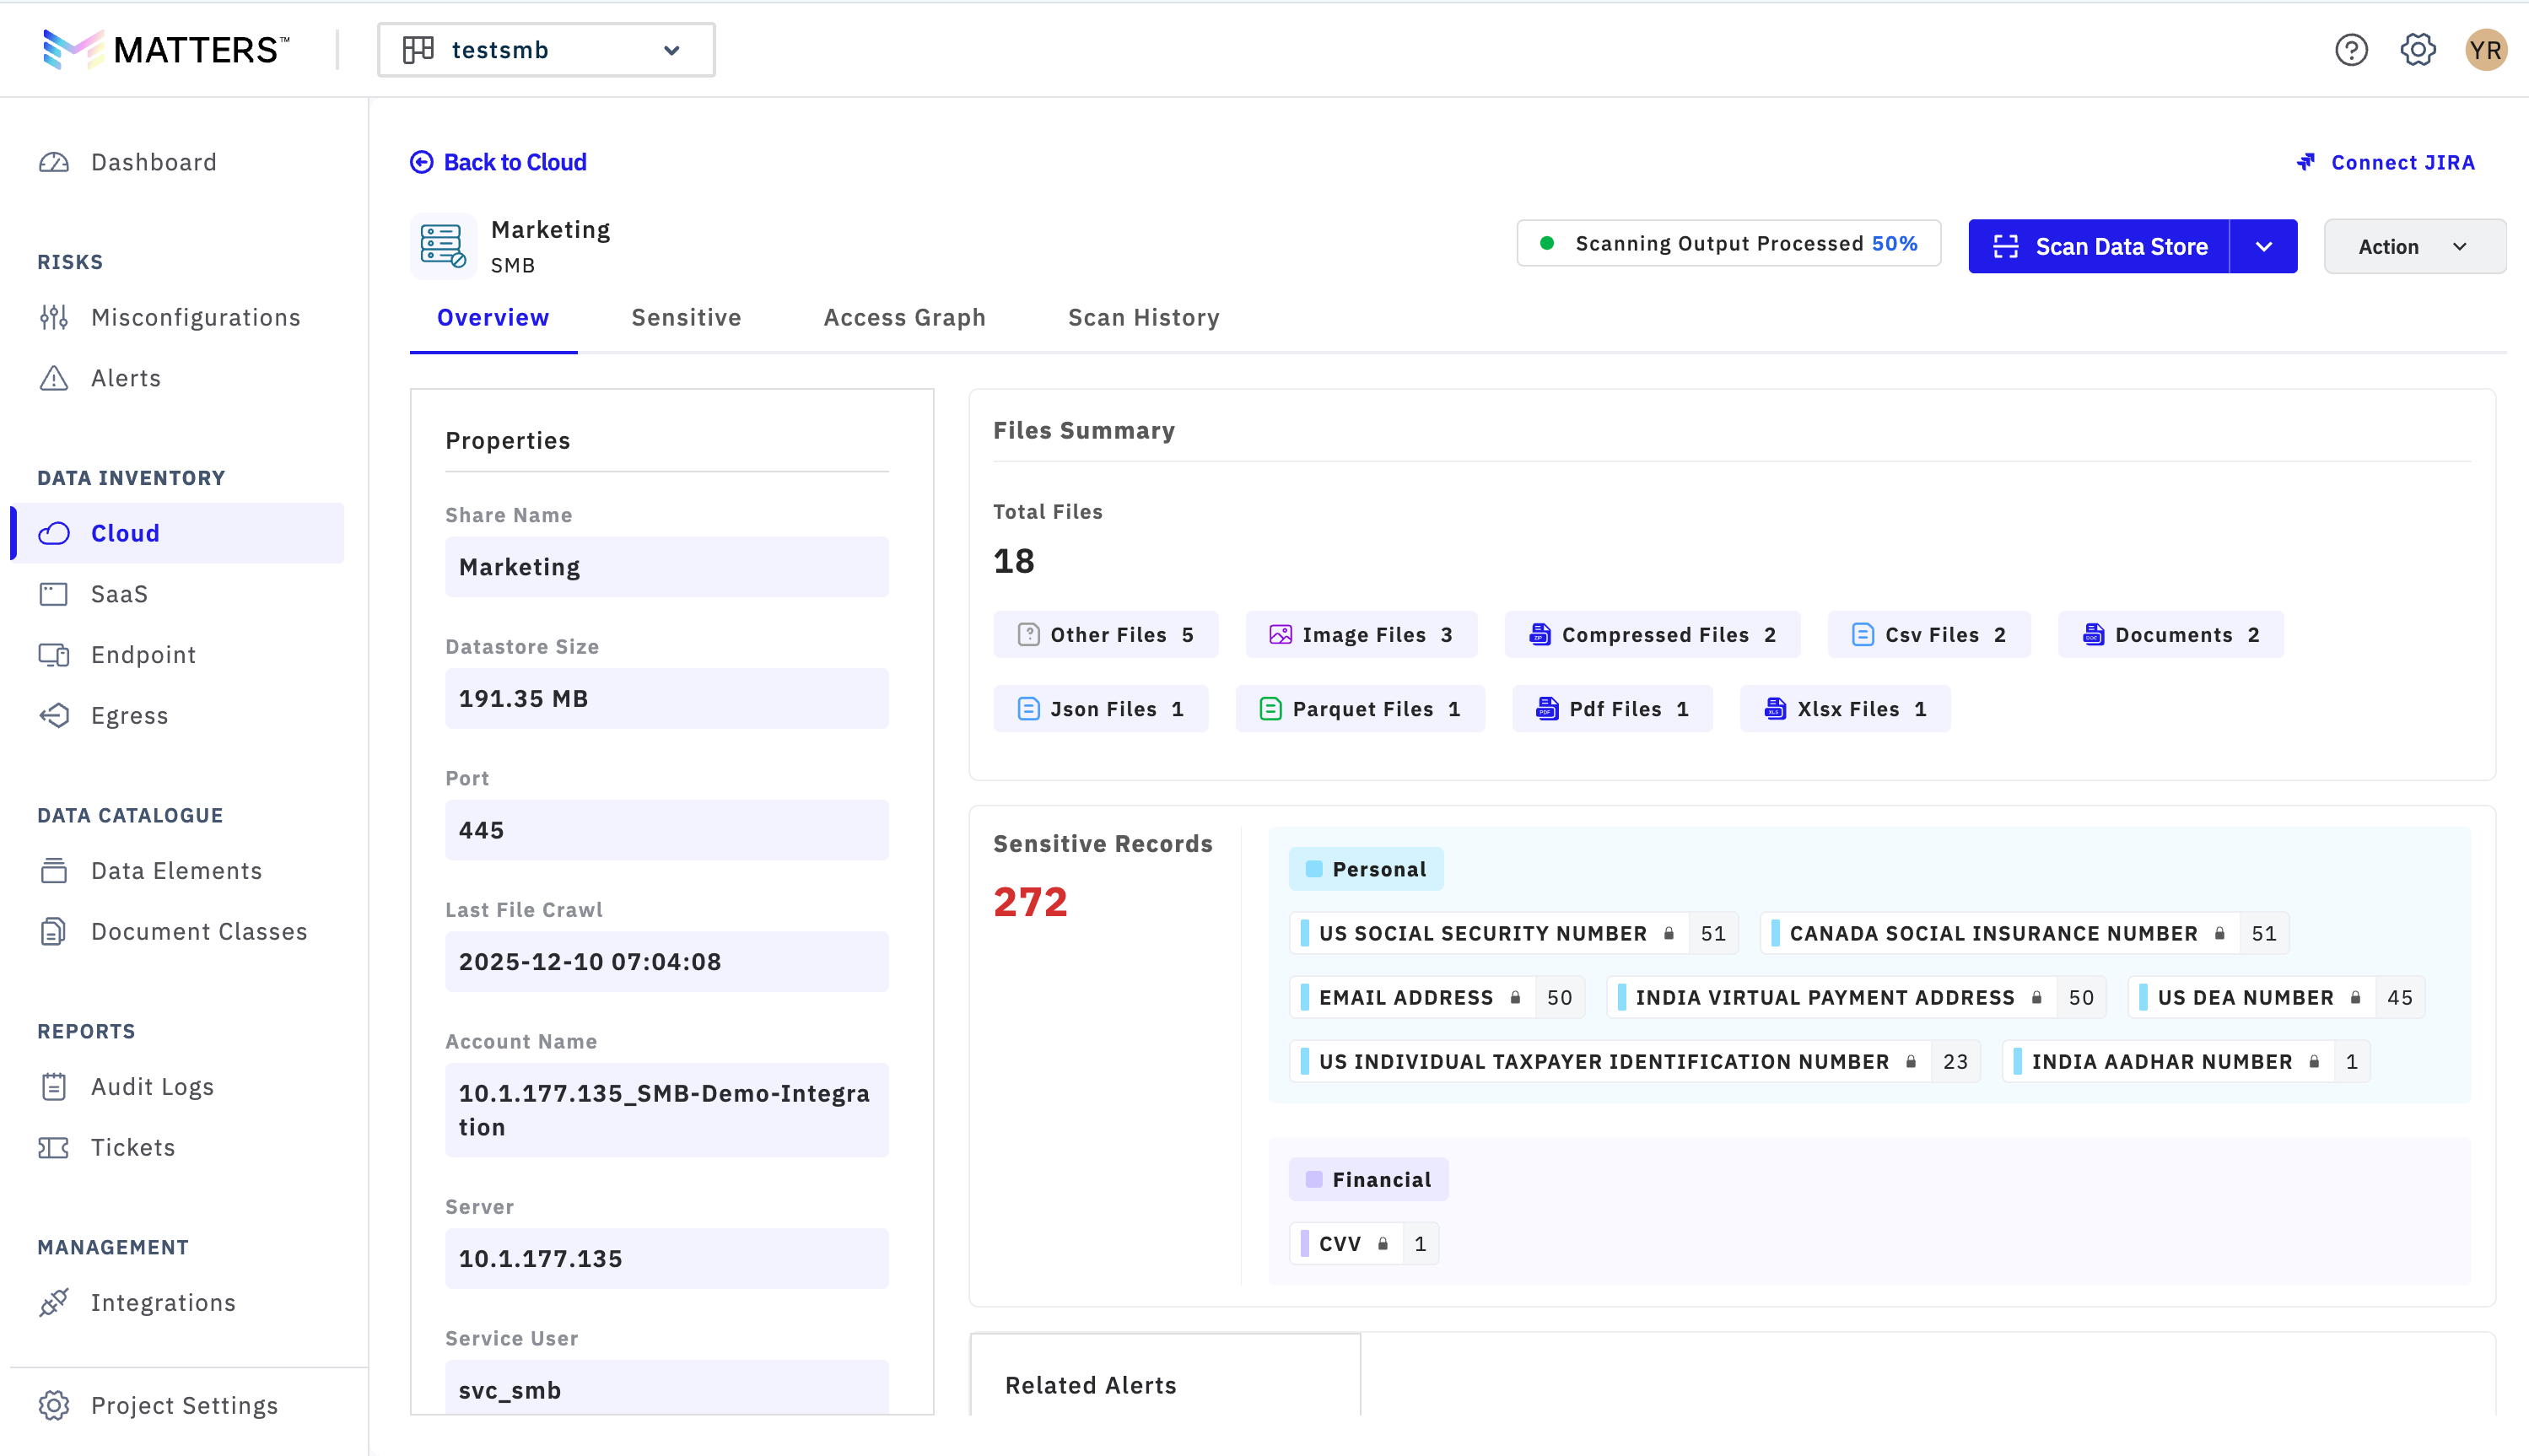
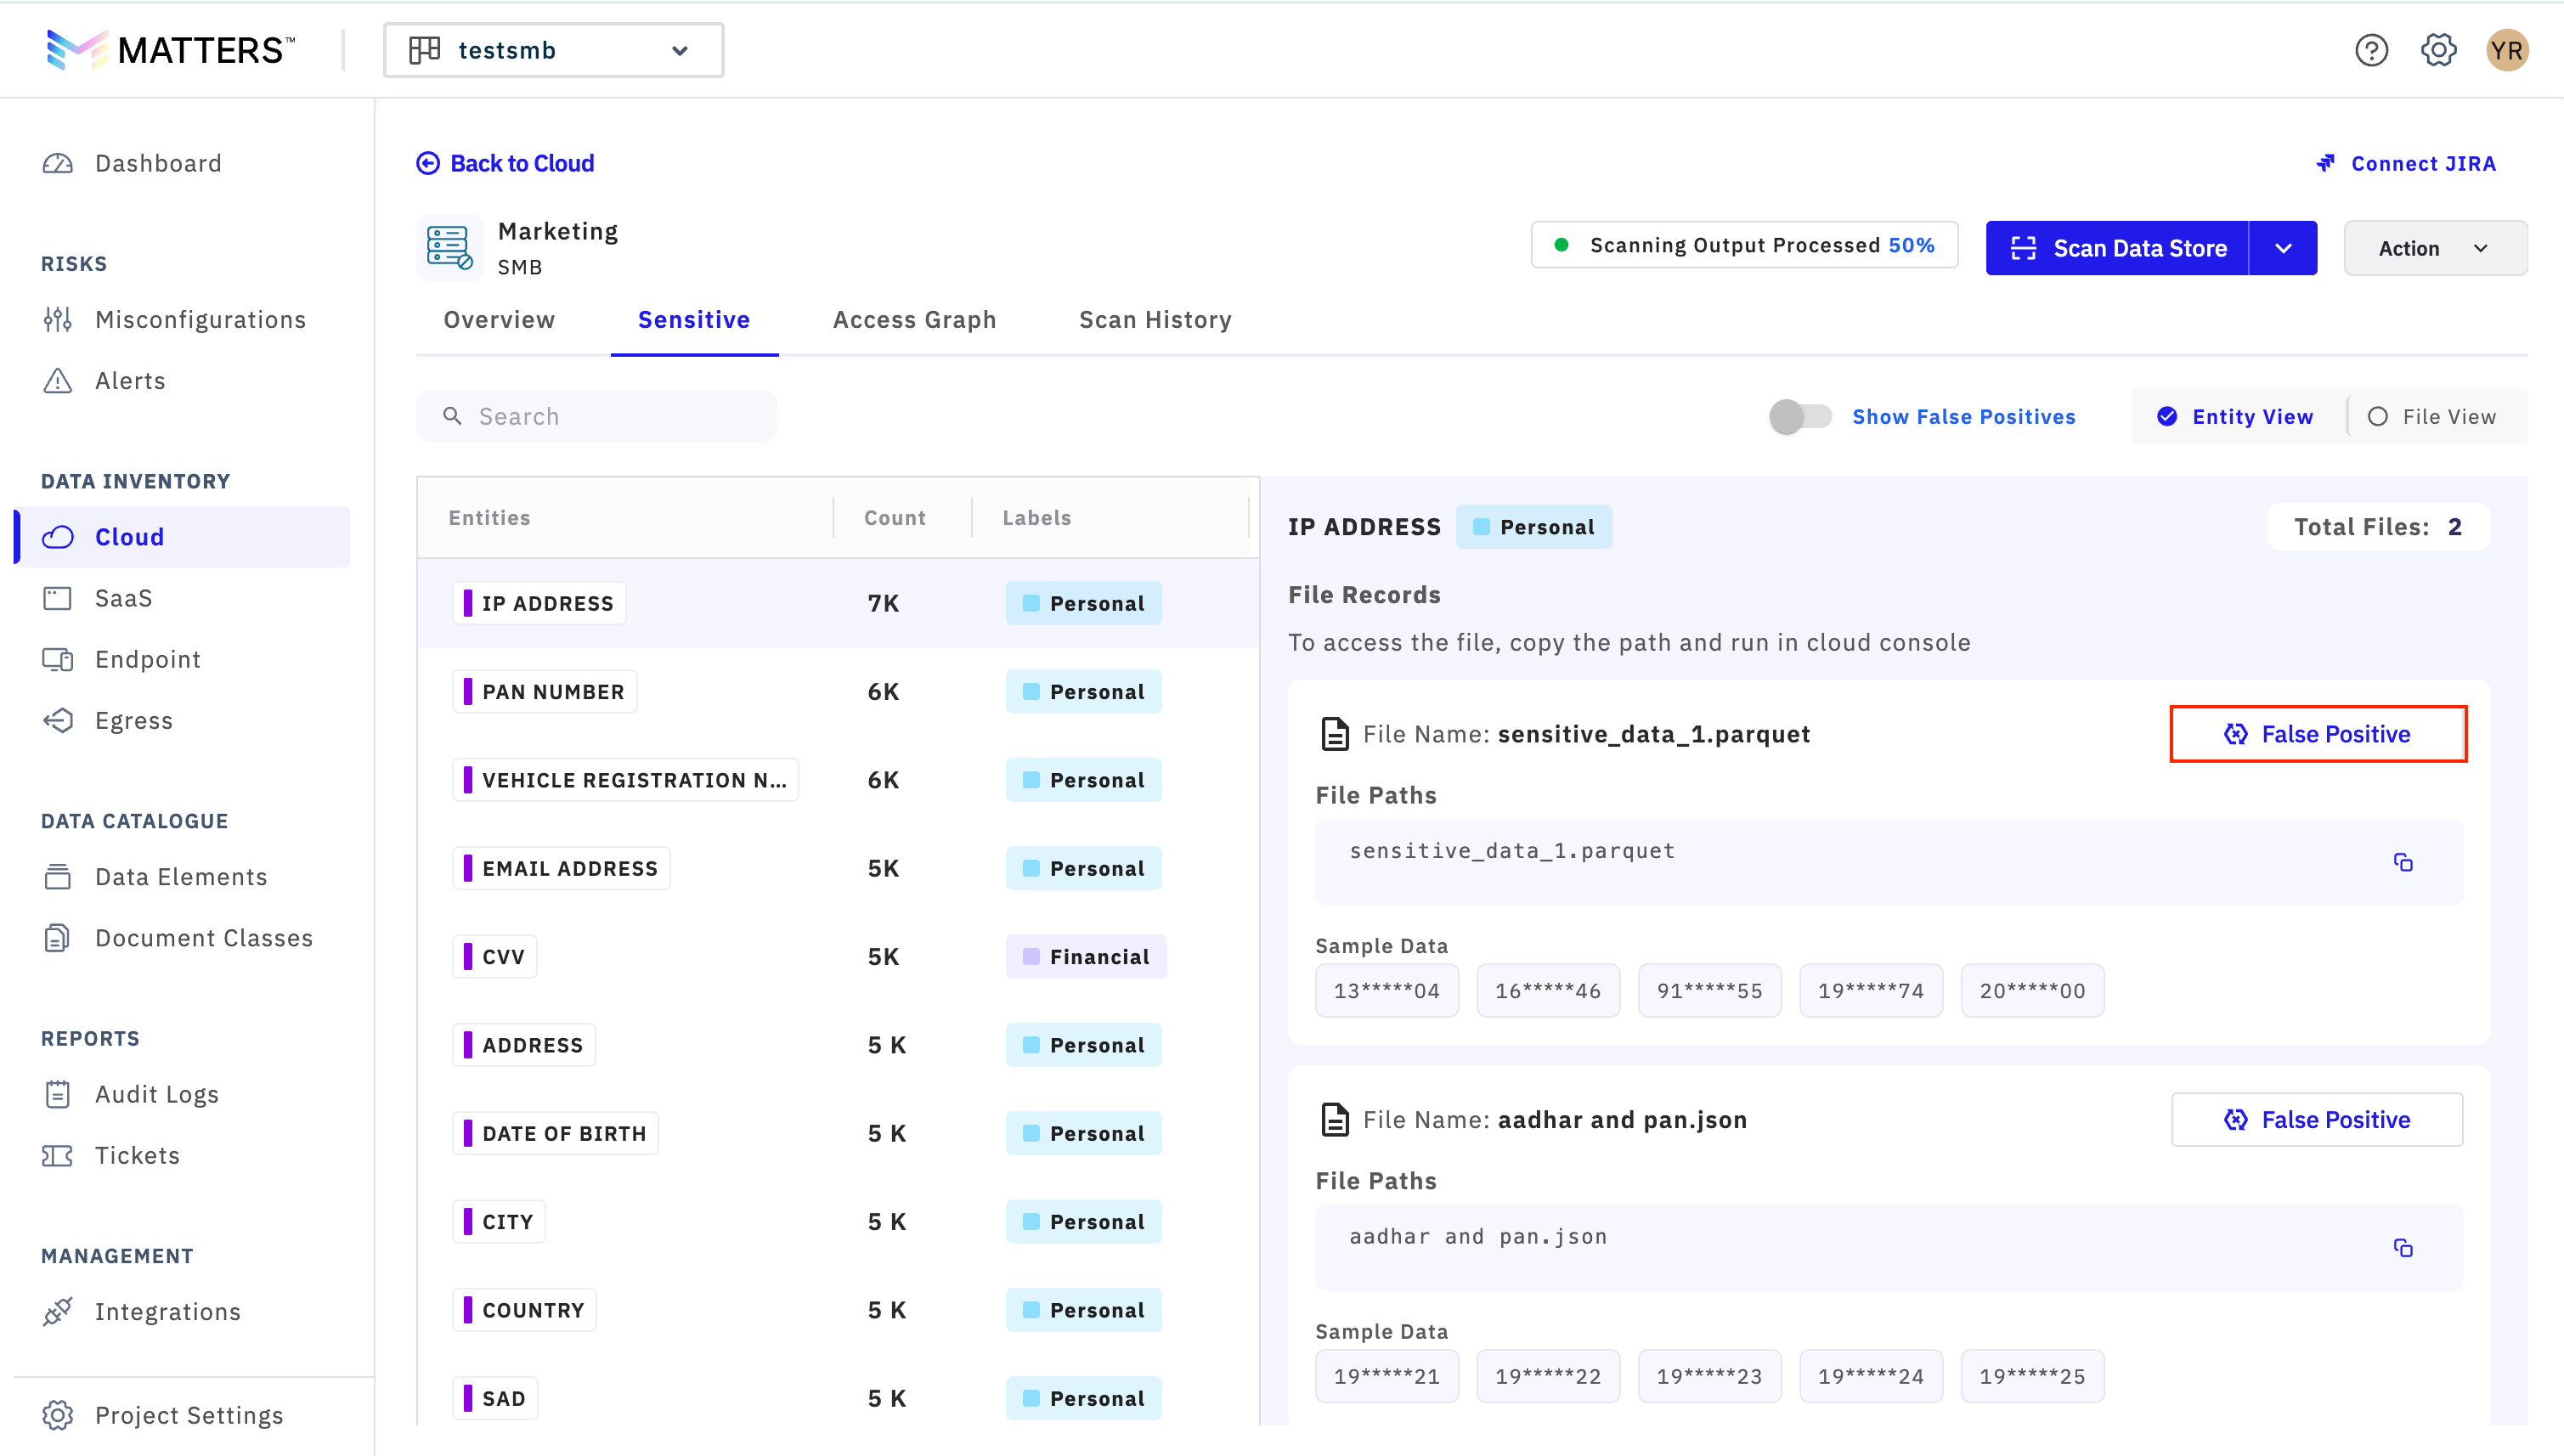
You can also view additional sensitivity details on the Sensitive page in both:
File View
Table View
Managing False Positives
If any detected entities are false positives, you can mark them by clicking the False Positive button. This helps improve the accuracy of the scan results and makes it easier to distinguish valid sensitive data from incorrectly detected entities.
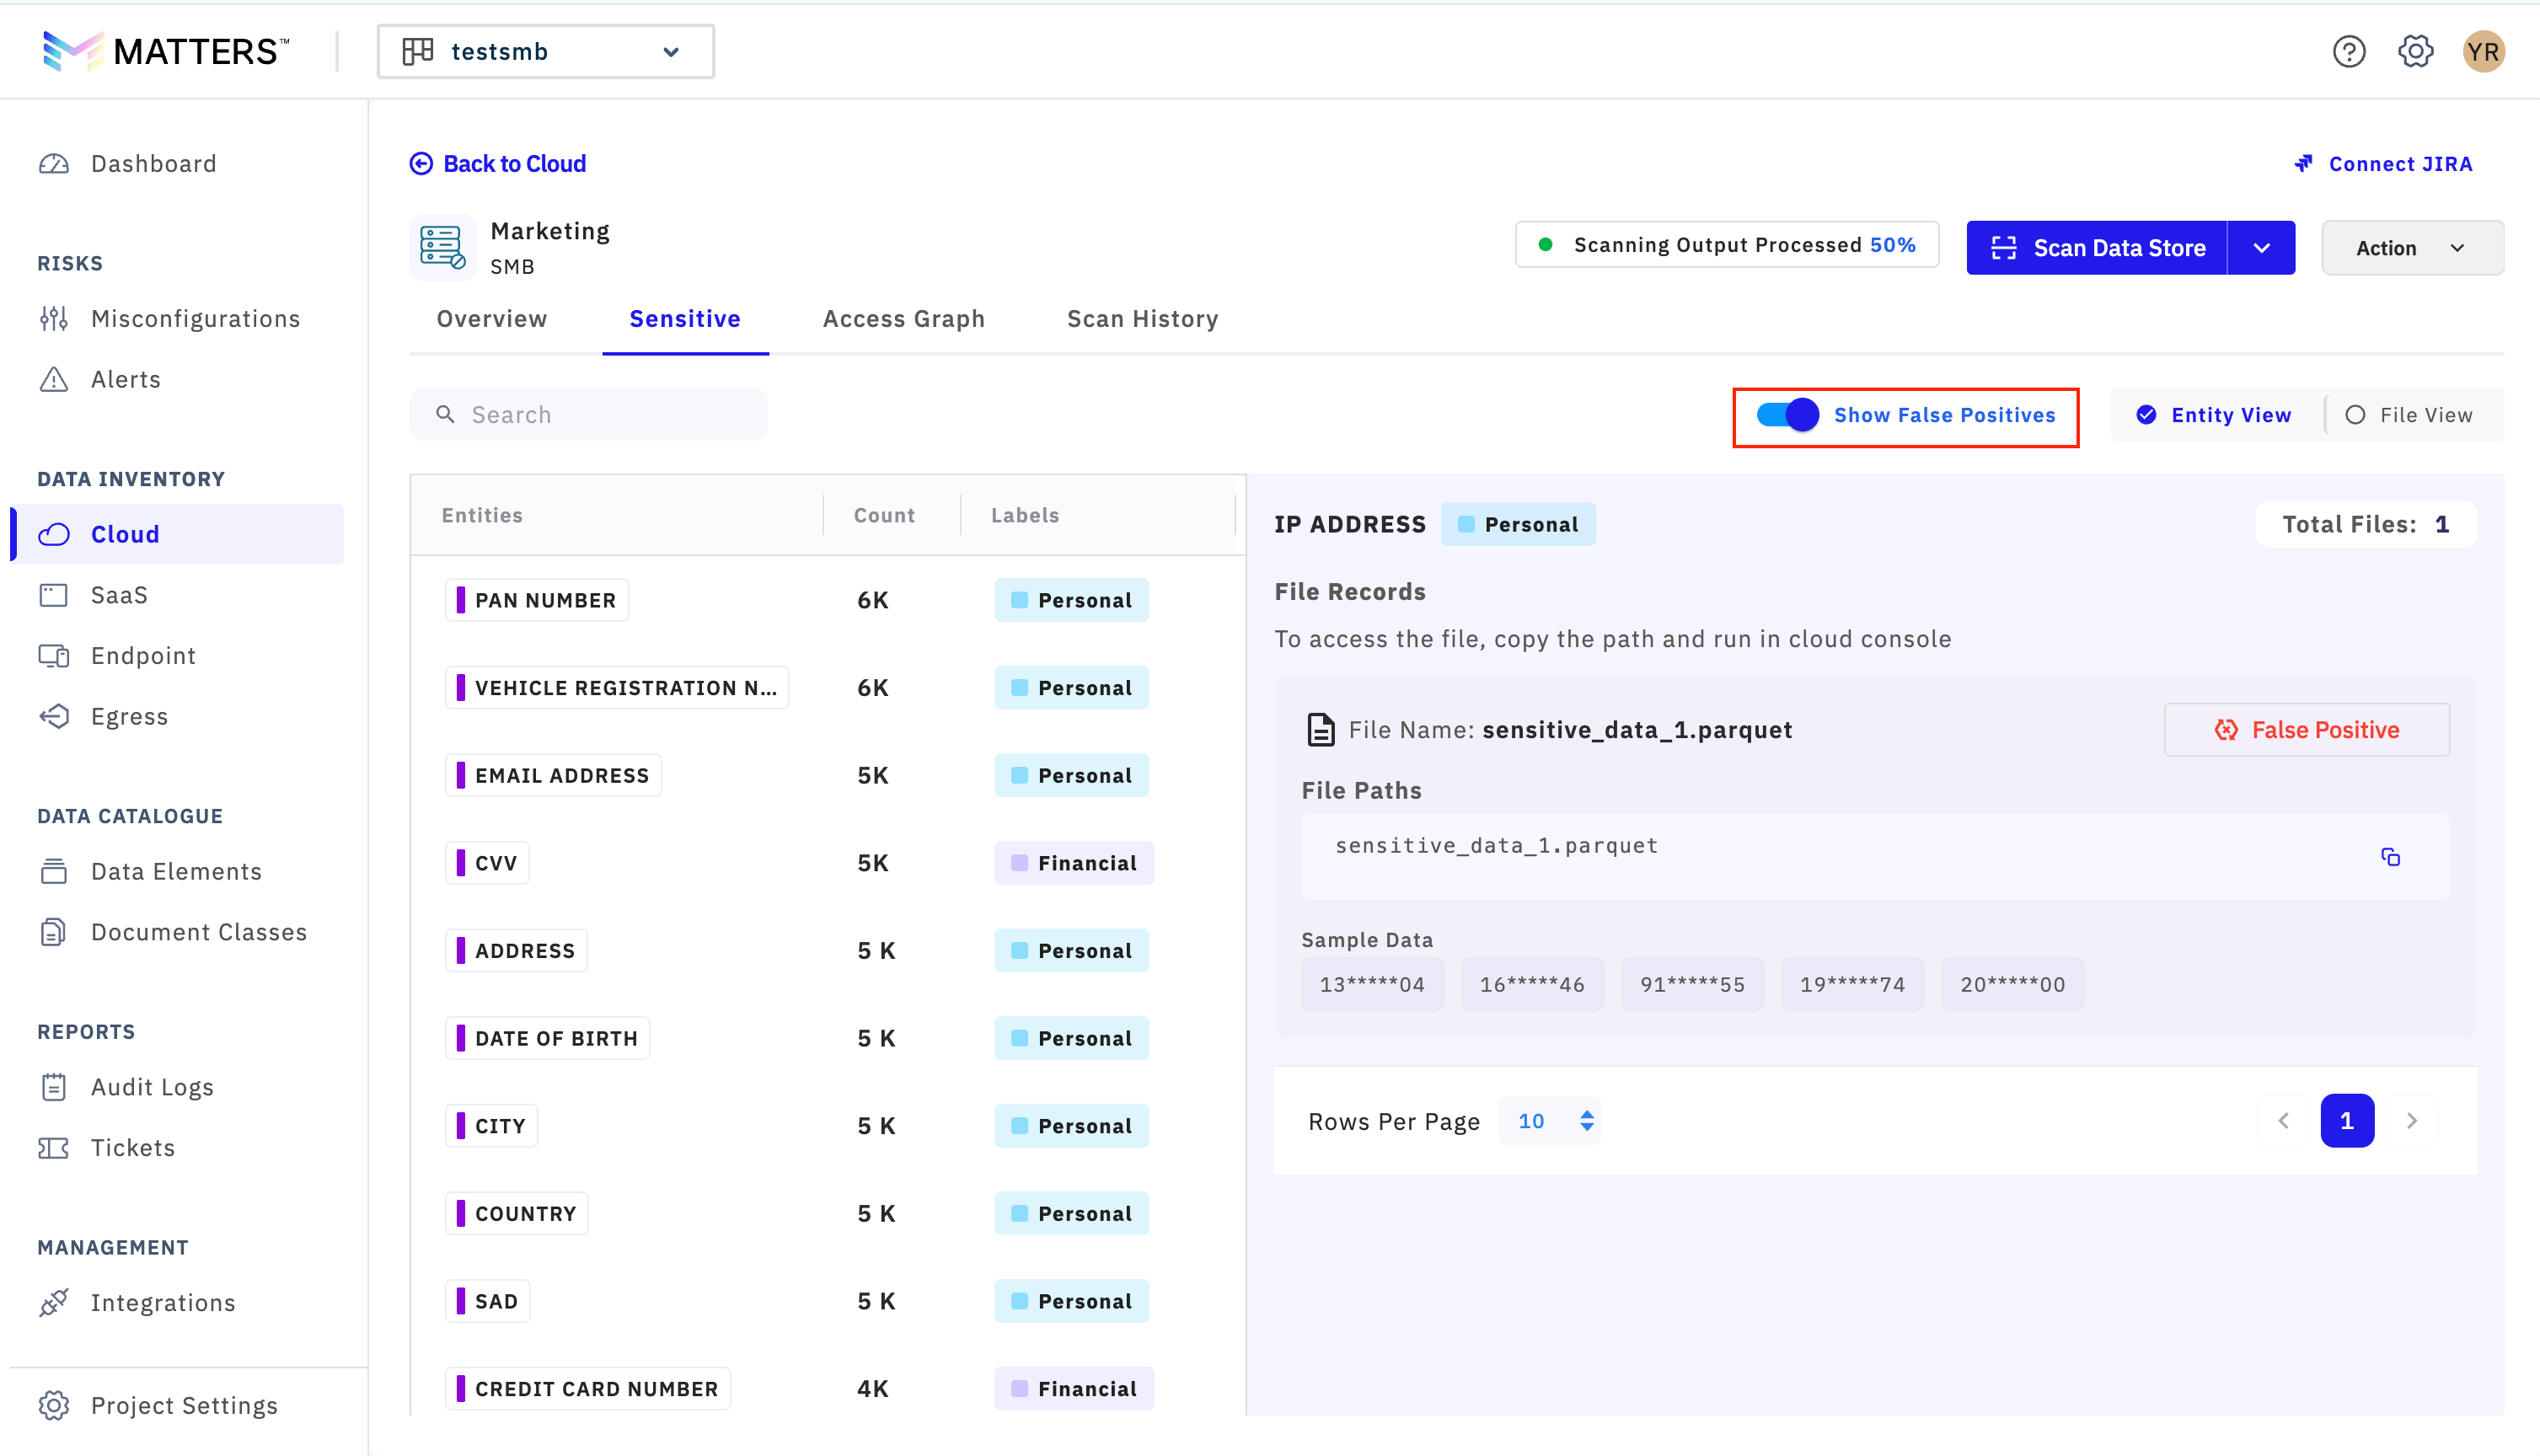
You can view false positives by enabling the toggle at the top of the page.
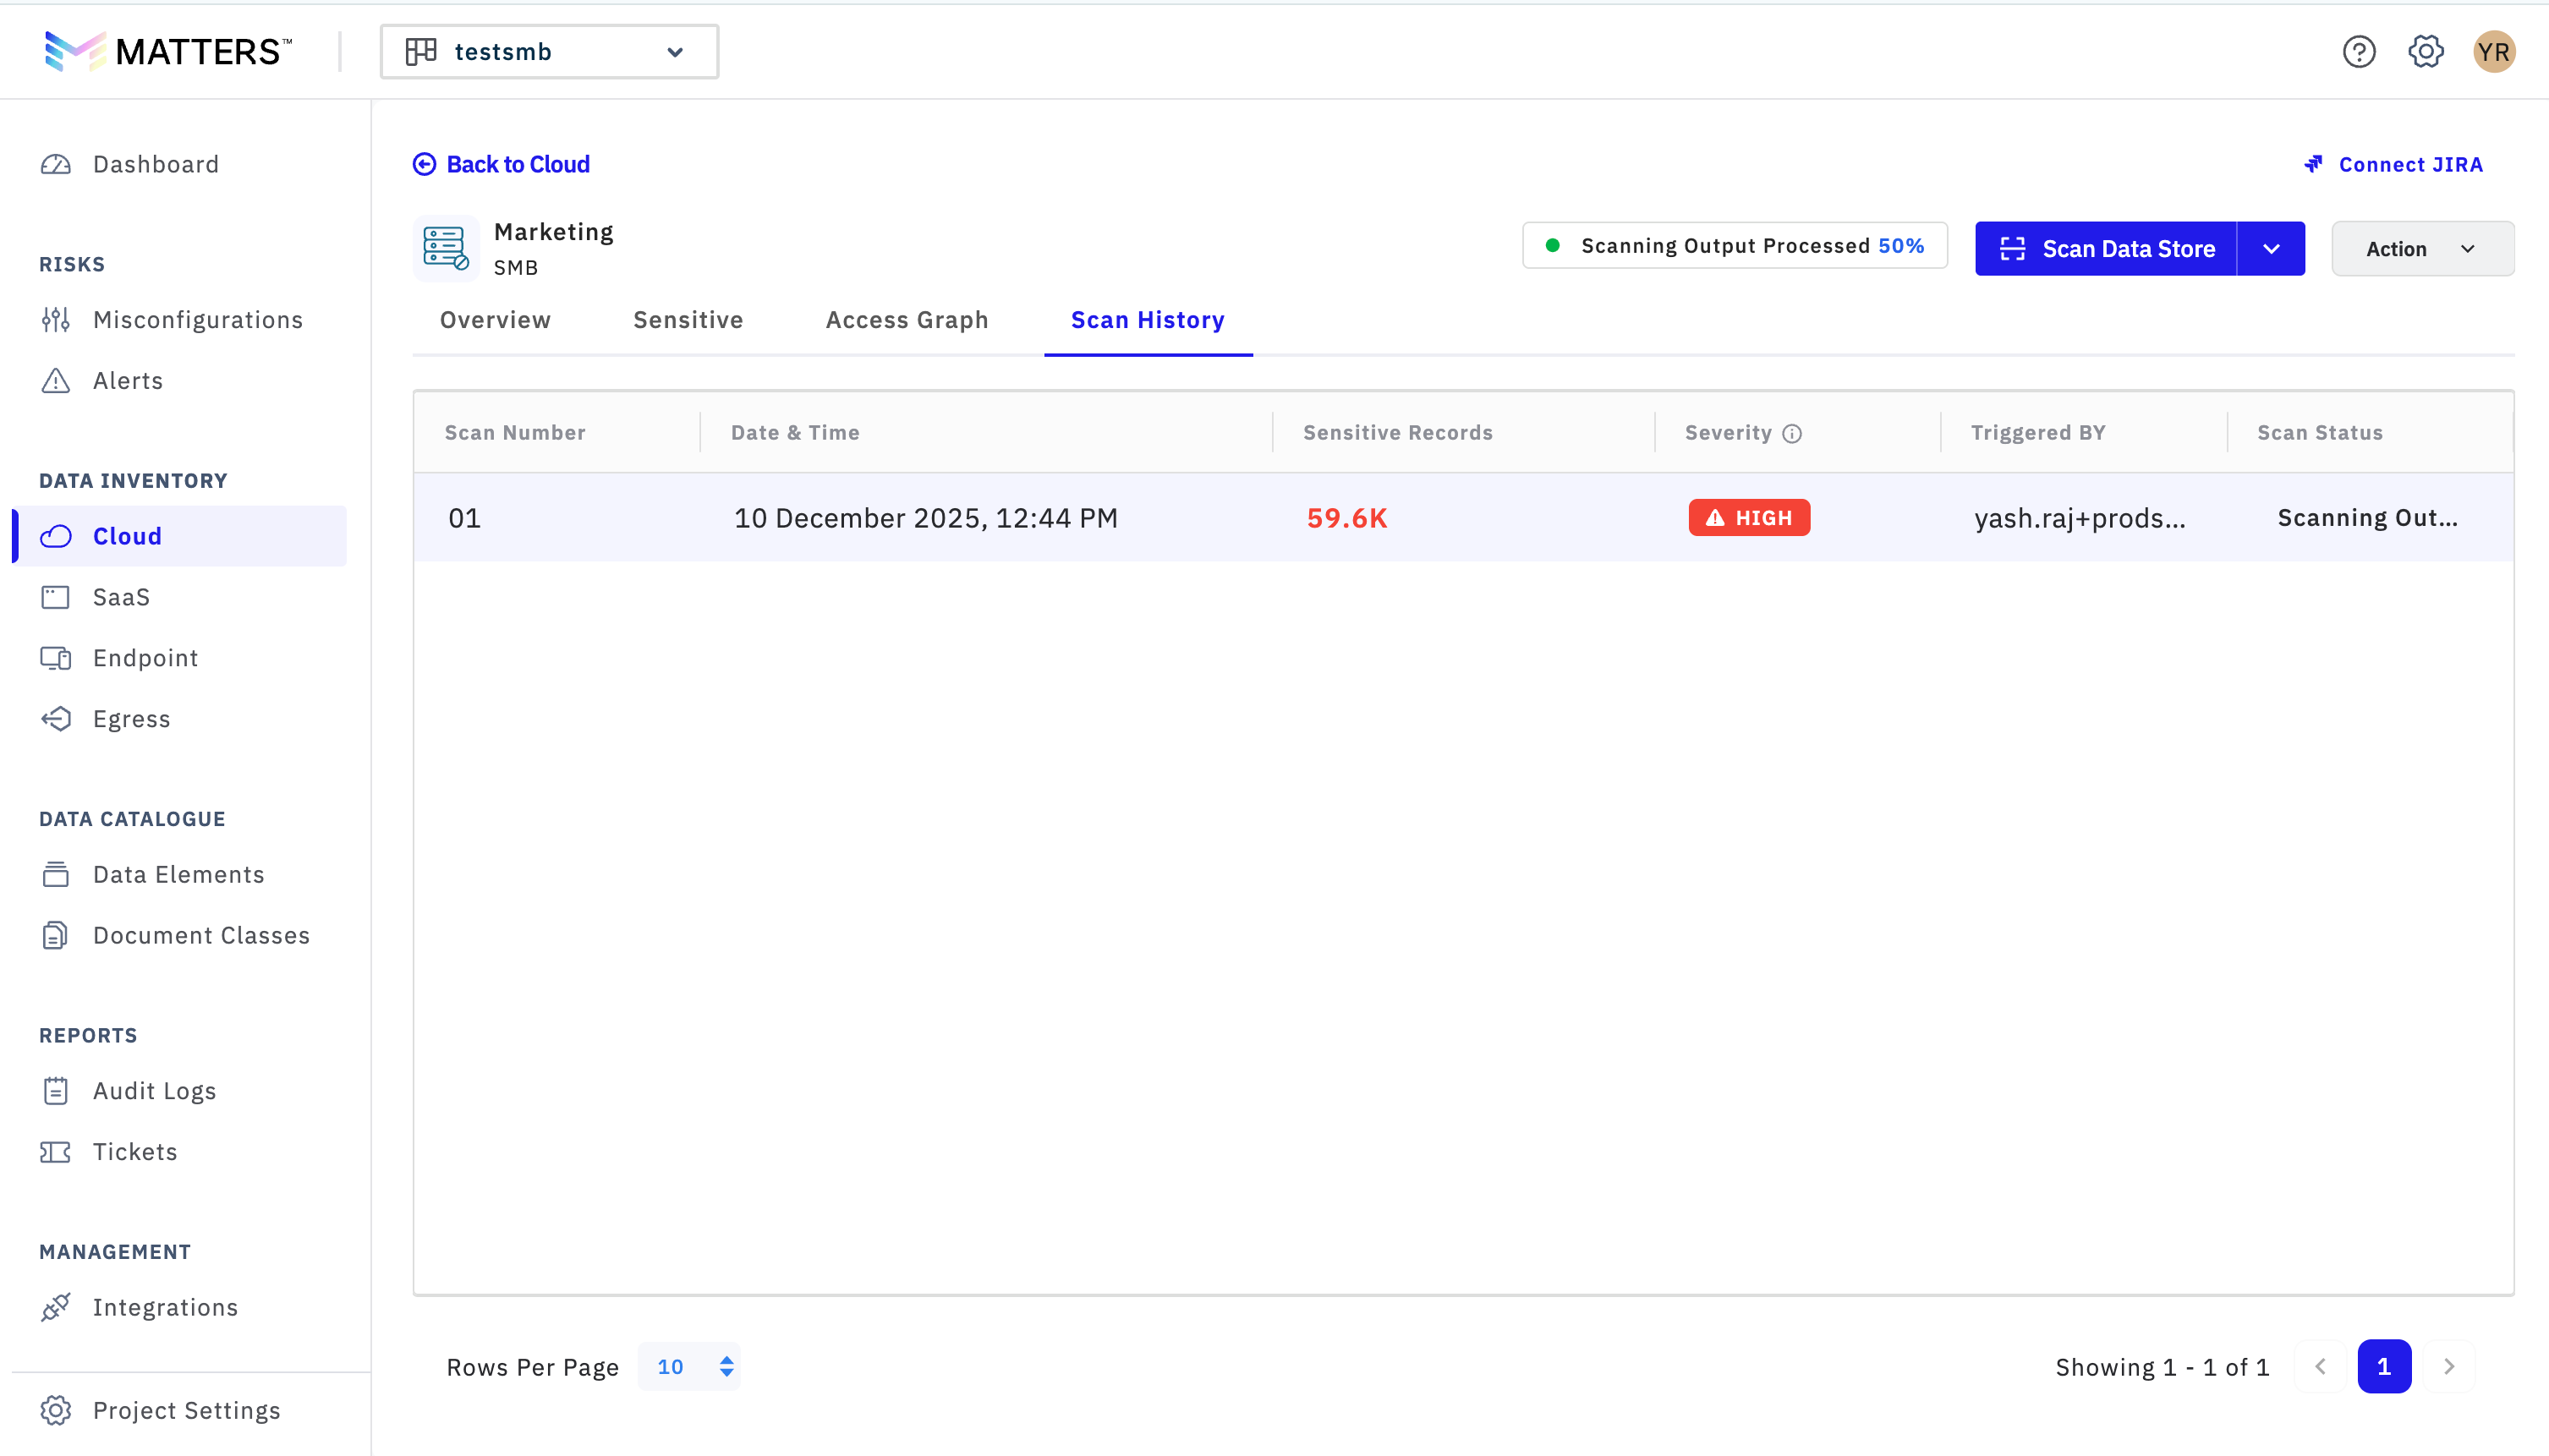
Scan History
The Scan History section provides a detailed record of all previous scans. This allows you to review past scan activity, track progress, and refer back to earlier scan results when required.
Additional Features:
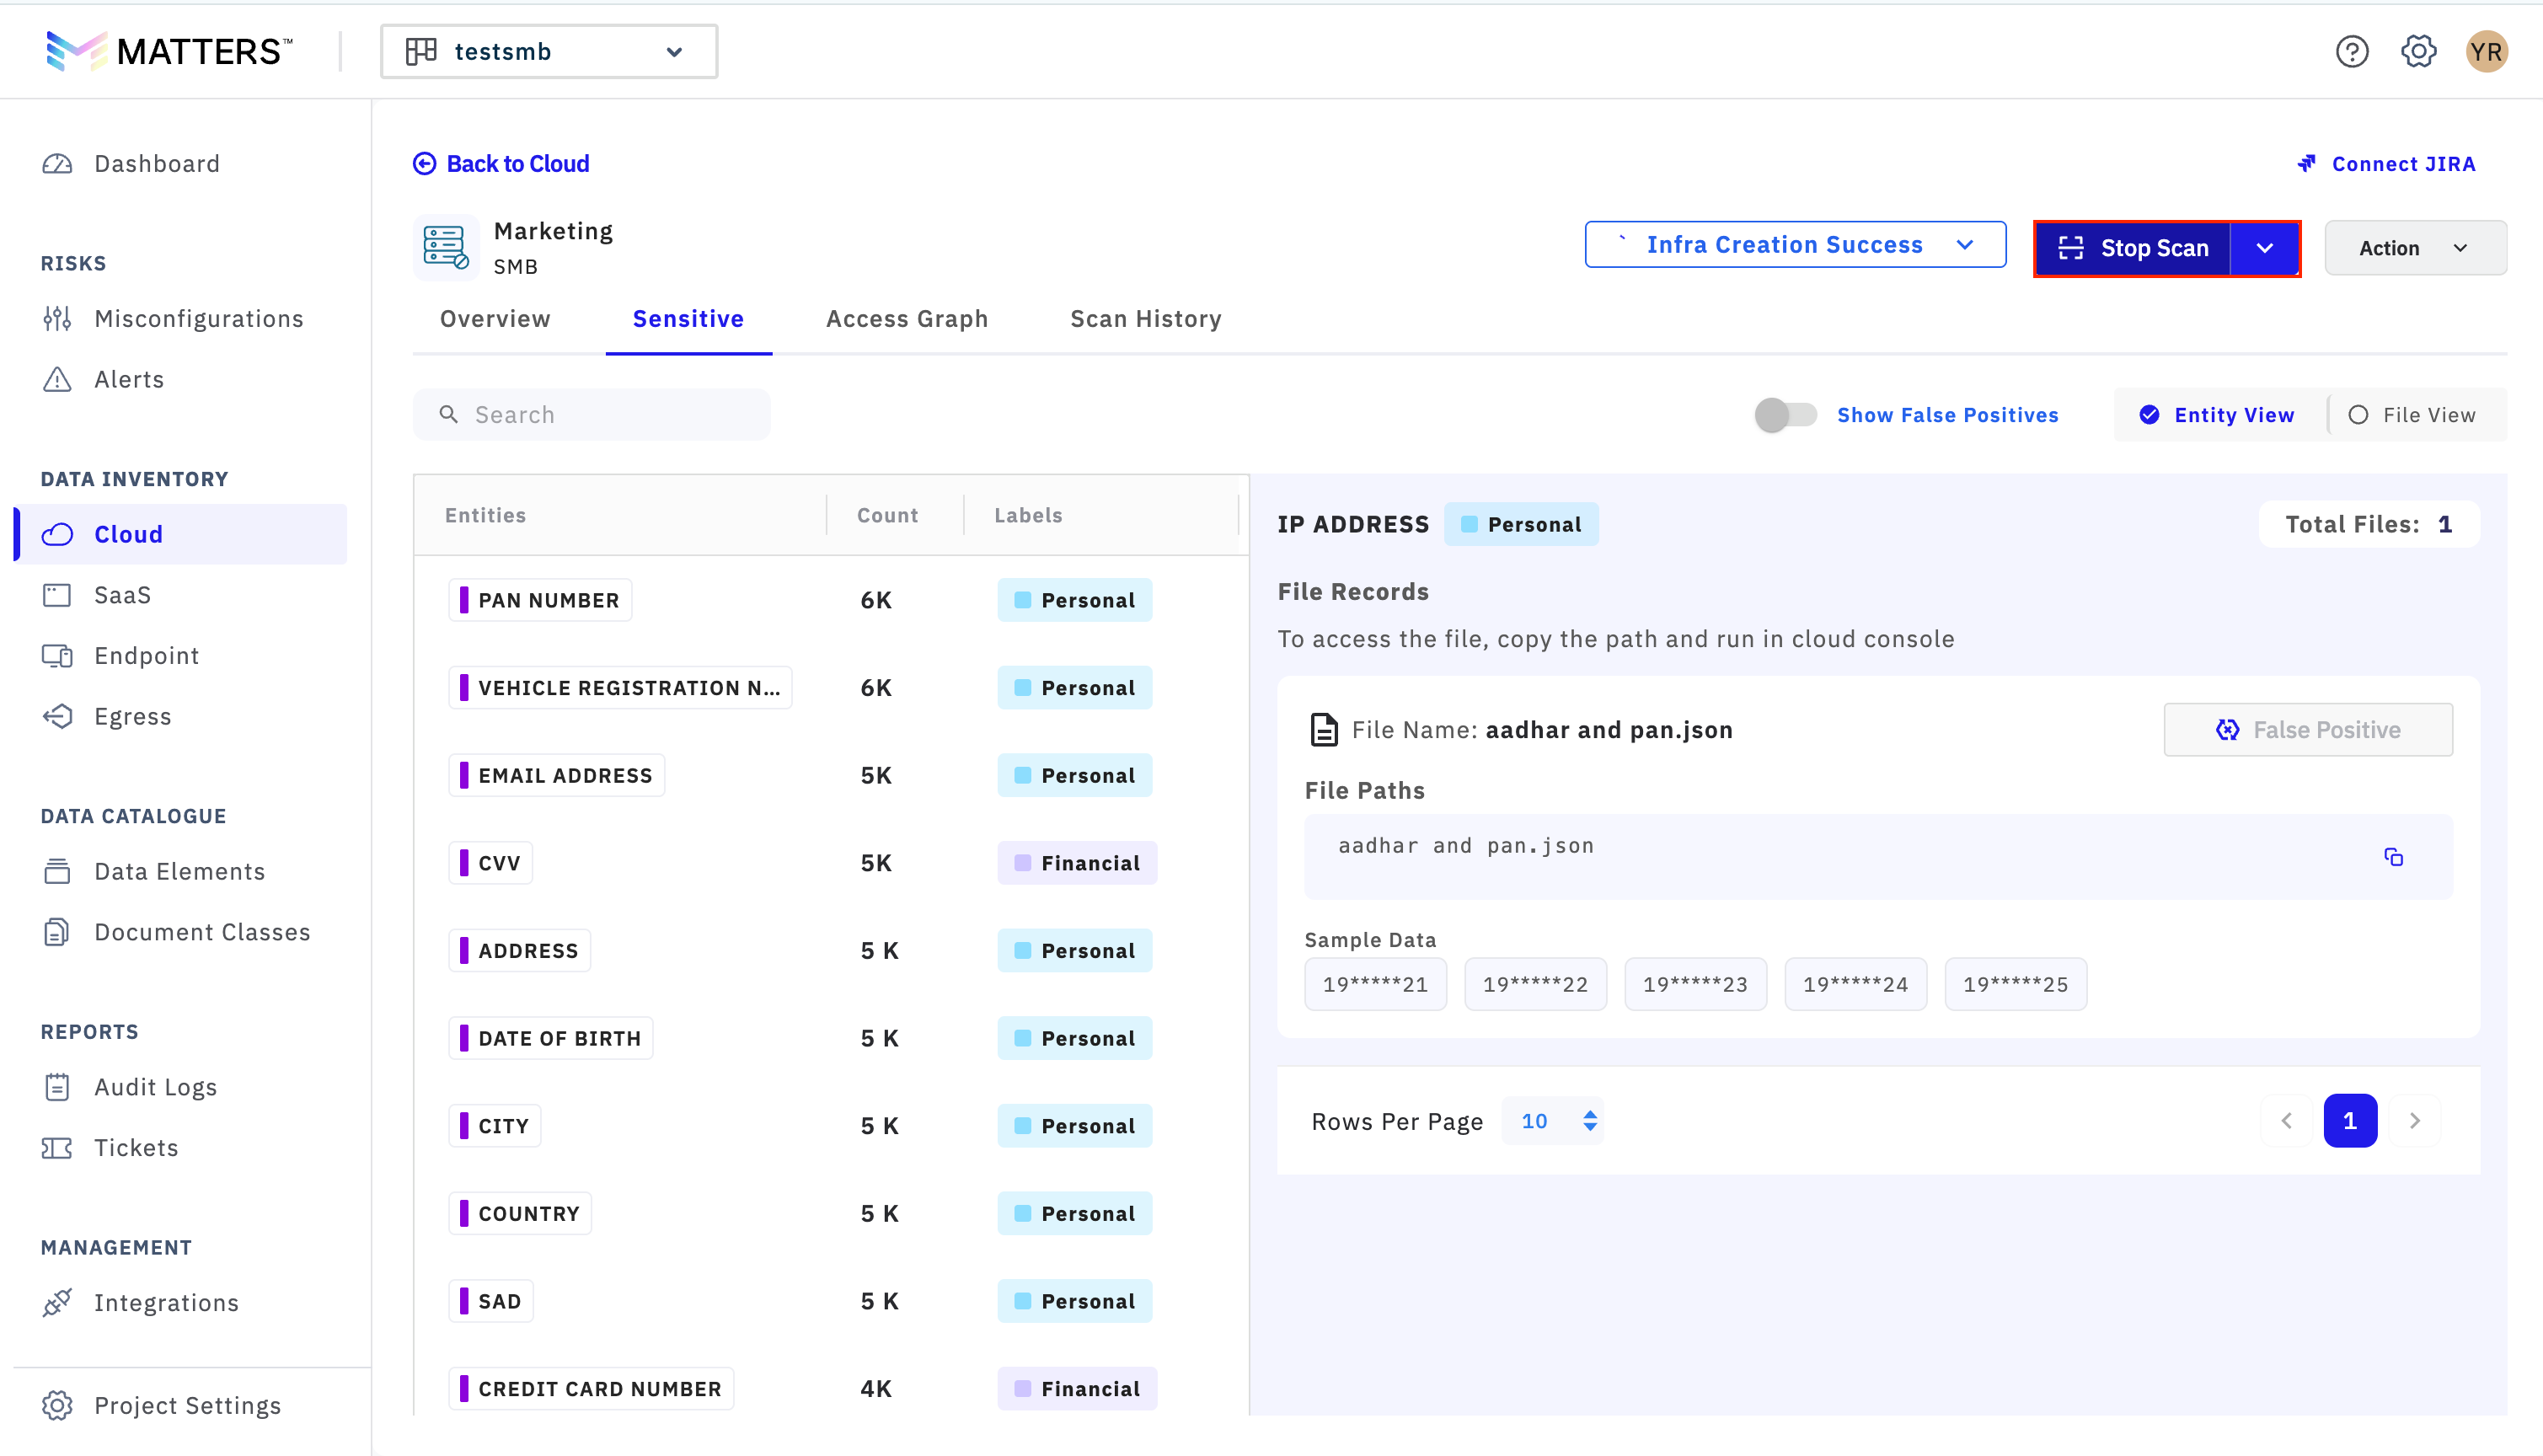
Stop Scan
You can stop a scan at any stage by selecting the Stop Scan option.
This is useful if you want to halt an ongoing scan, manage system resources, or stop an incomplete or incorrectly triggered scan.
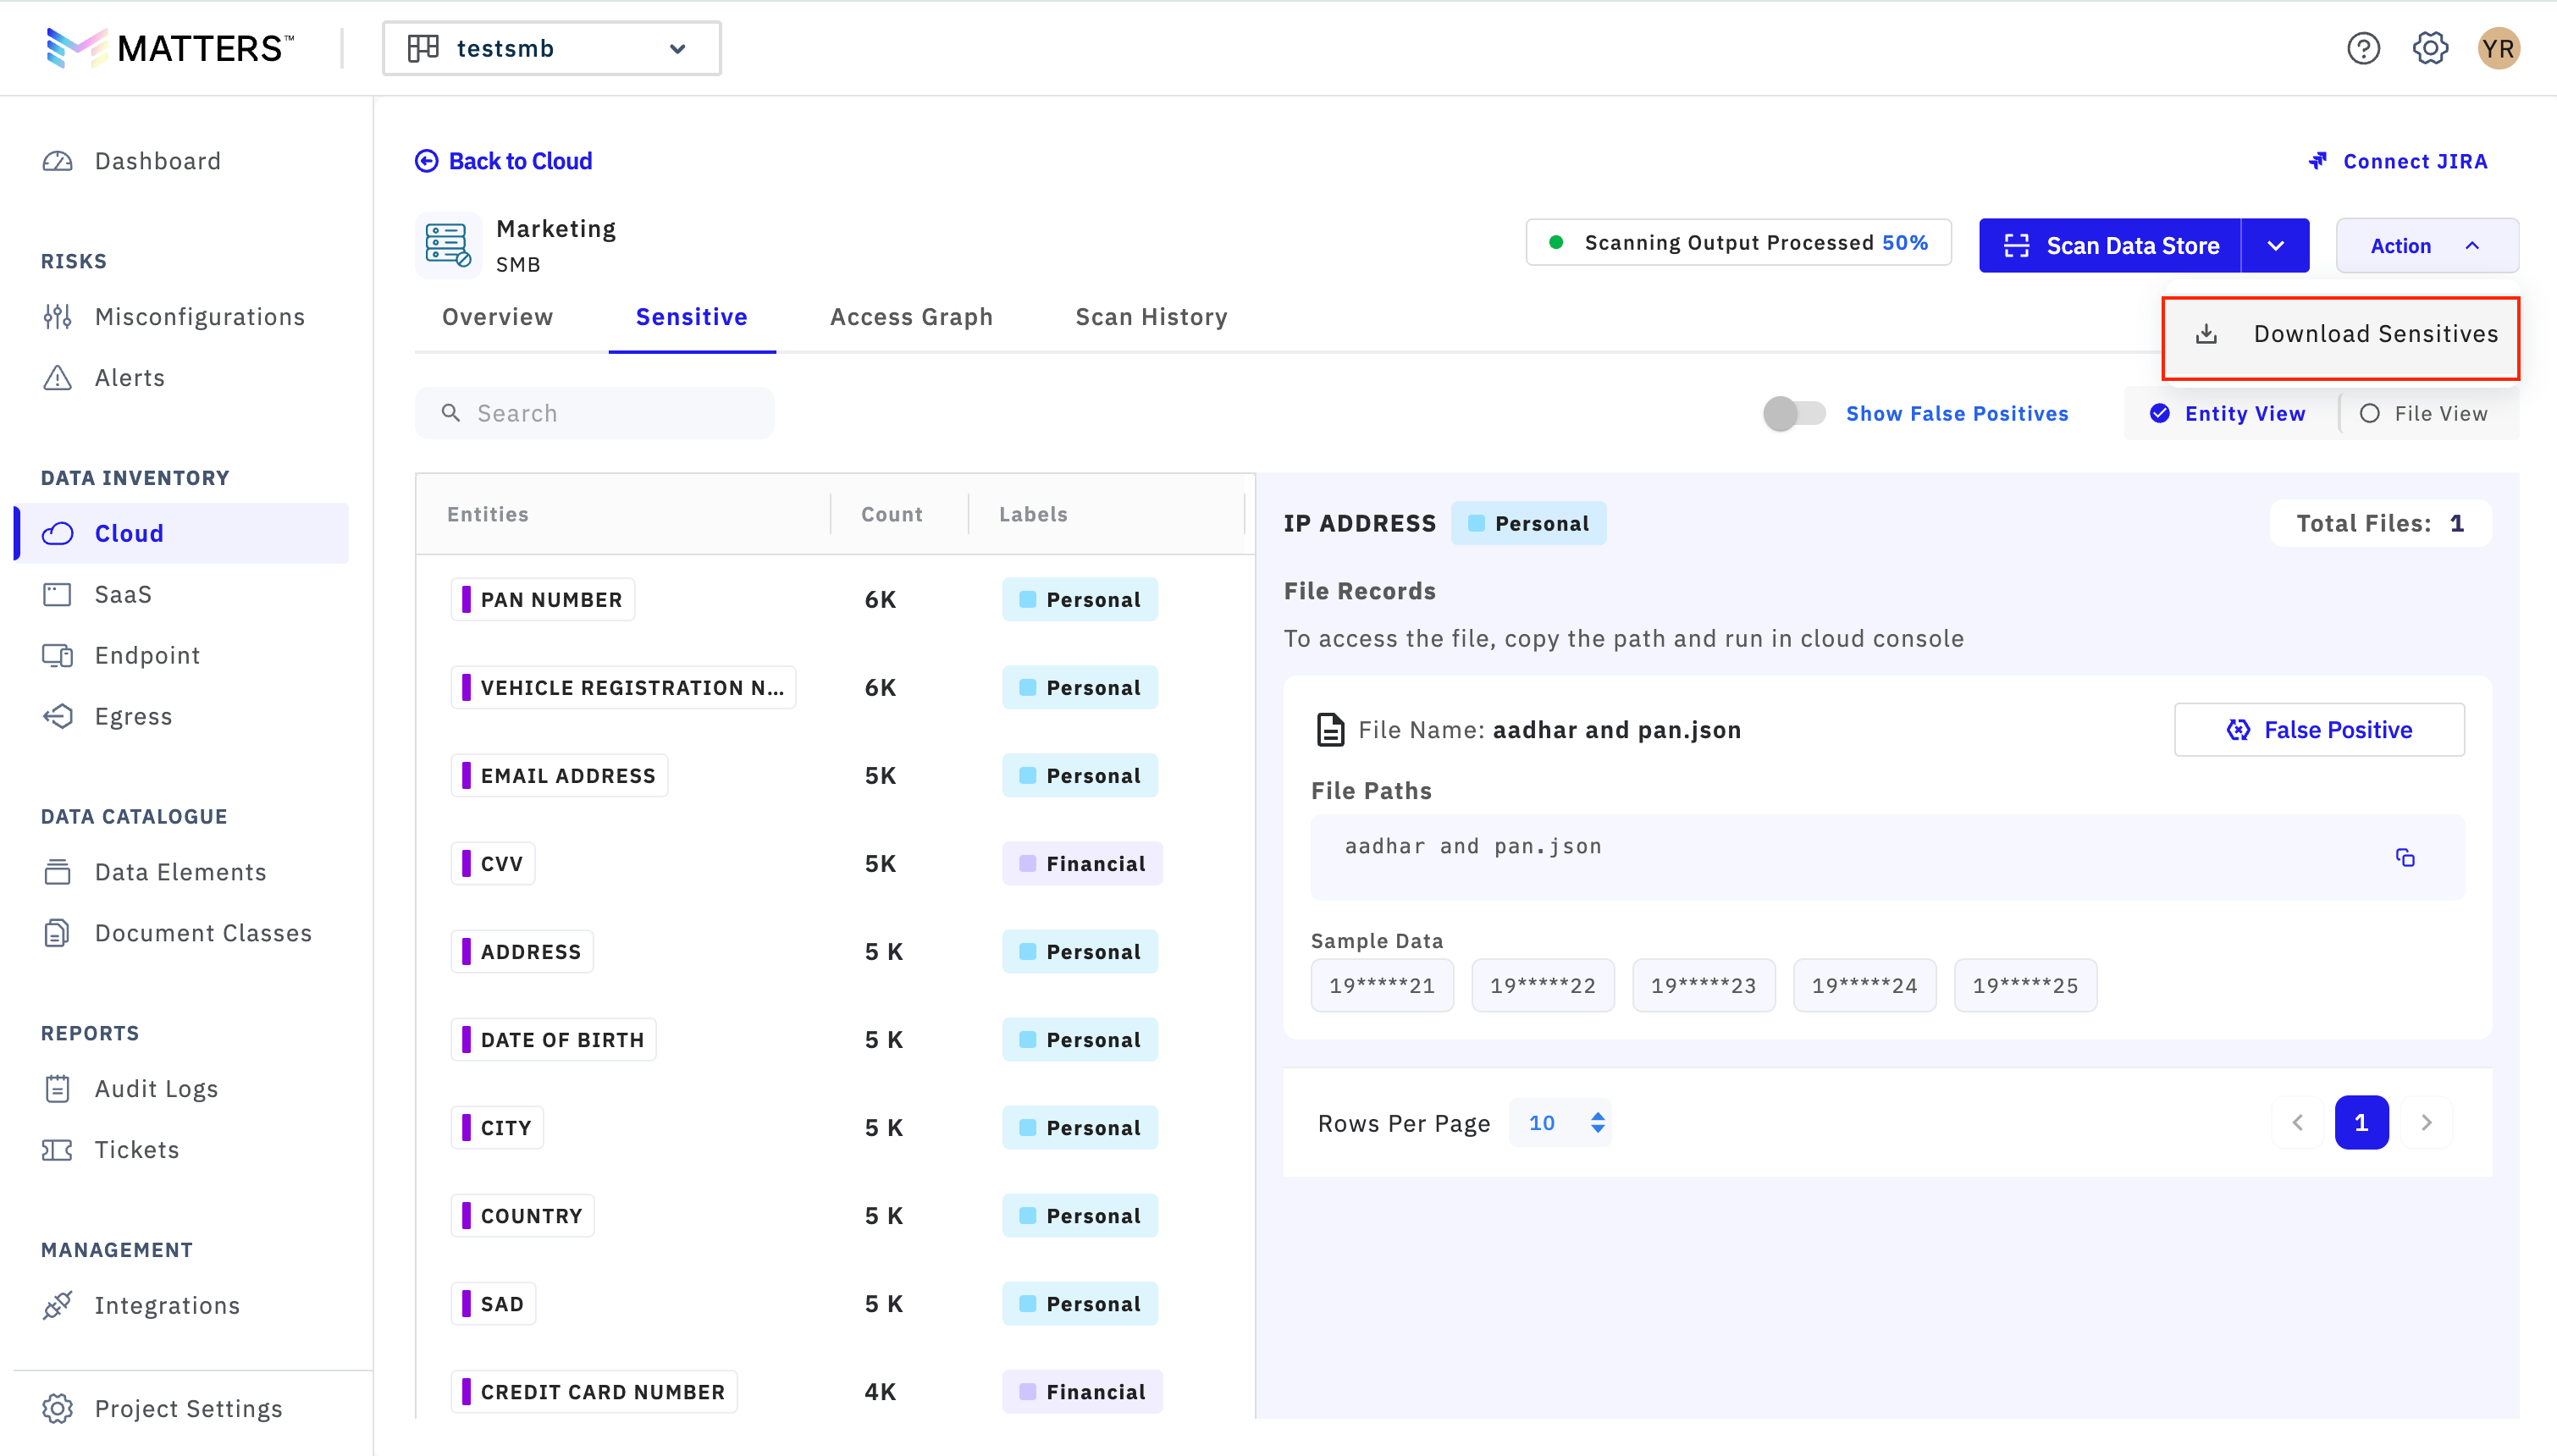
2. Export Sensitivity Data to CSV
After a scan is completed, you can export the sensitivity details in CSV format.
To export the data:
Click the Actions button.
Select Download the CSV file.
This exported data can be used for further analysis, reporting, auditing, or sharing with relevant stakeholders.